Database Lab tutorial for Amazon RDS
DBLab Engine (DLE) is used to boost software development and testing processes by enabling ultra-fast provisioning of databases of any size. In this tutorial, we will install DBLab Engine from the AWS Marketplace. If you are an AWS user, this is the fastest way to have powerful database branching for any database, including RDS and RDS Aurora. But not only RDS: any Postgres and Postgres-compatible database can be a source for DLE.
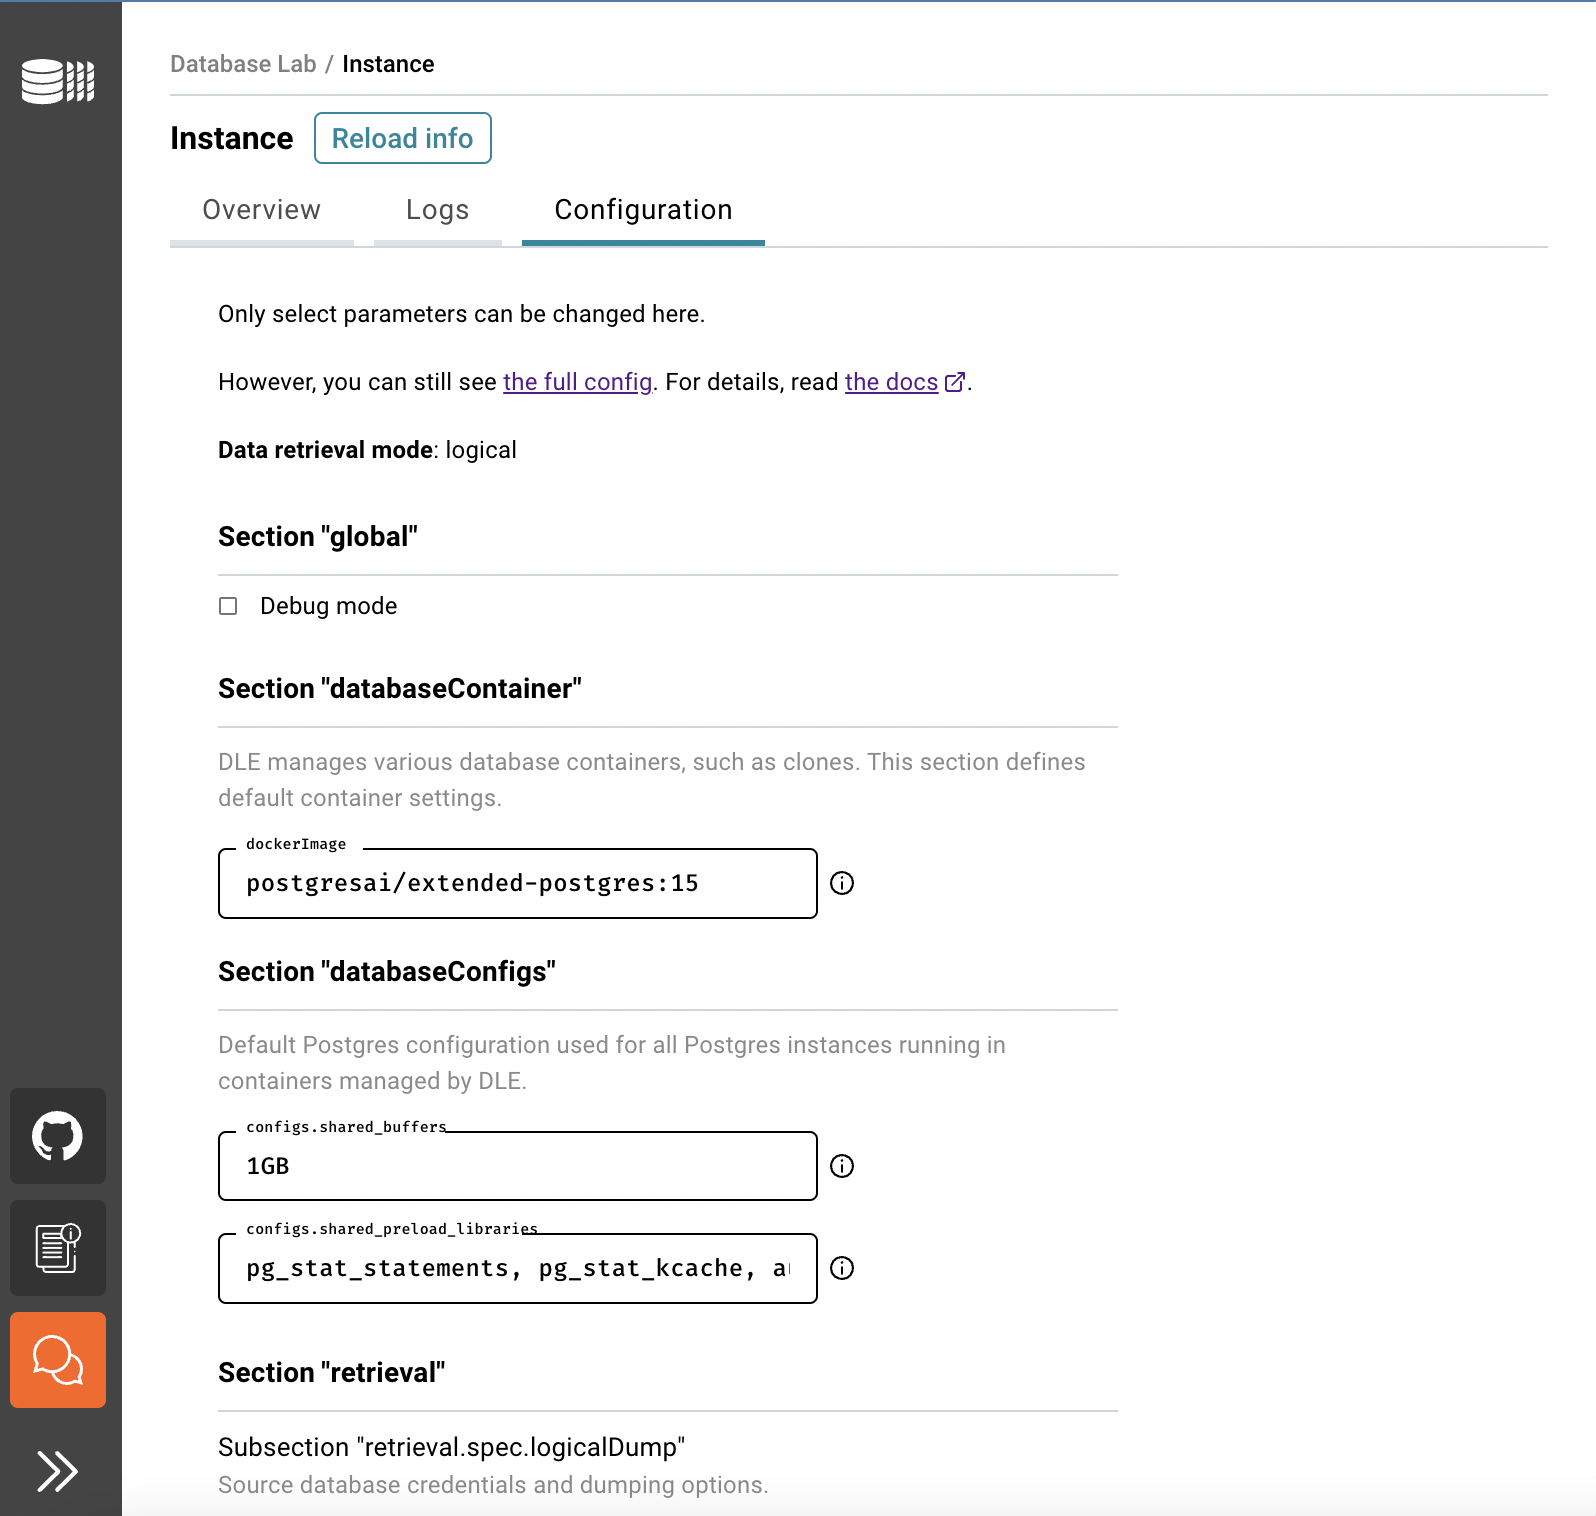
Currently, the AWS Marketplace version of DLE focuses on the "logical" data provisioning mode (dump/restore) – the only possible method for managed PostgreSQL cloud services such as RDS Postgres, RDS Aurora Postgres, Azure Postgres, or Heroku. "Physical" mode (obtaining databases at the file level) is also supported in DLE but requires additional efforts – namely, editing the DLE configuration file manually. More information about various data retrieval options can be found here.
Compared to traditional RDS clones, Database Lab clones are instant. RDS cloning takes several minutes, and, depending on the database size, additional dozens of minutes or even hours may be needed to "warm up" the database (see "Lazy load"). Obtaining a new DLE clone takes as low as a few seconds, and it does not increase storage and instance bill at all.
A single DLE instance can be used by dozens of engineers or CI/CD pipelines – all of them can work with dozens of thin clones located on a single instance and single storage volume. RDS Aurora clones are also "thin" by nature, which could be great for development and testing. However, each Aurora clone requires a provisioned instance, increasing the "compute" part of the bill; IO-related charges can be significant as well. This makes Aurora clones less attractive for the use in non-production environments. The use of DLE clones doesn't affect the bill anyhow – both "compute" and "storage" costs remain constant regardles of the number clones provisioned at any time.
Typical "pilot" setup
Timeline:
- Create and configure DLE instance - ~10 minutes
- Wait for the initial data provisioning (full refresh) - ~30 minutes (for a 100 GiB database; DLE is running on a very small EC2 instance, r5.xlarge)
- Try out cloning - ~20 minutes
- Show the DLE off to your colleagues - one more hour
Outcome:
- Total time spent: 2 hours
- Total money spent (r5.xlarge, 200 GiB disk space for EBS volume + DLE Standard subscription): less than $2
- The maximum number of clones running in parallel with default configuration (
shared_buffers = 1GBfor each clone): ~30 clones - Monthly budget to keep this DLE instance: $360 per month – same as for a single traditional RDS clone
Prerequisites
- AWS cloud account
- SSH client (available by default on Linux and MacOS; Windows users: consider using PuTTY)
- A key pair already generated for the AWS region that we are going to use during the installation; if you need to generate a new key pair, read the AWS docs: "Create key pairs".
Steps
- Install DLE from the AWS Marketplace
- Configure and launch the DBLab Engine
- Start using DBLab UI, API and client CLI to clone Postgres database in seconds
Step 1. Install DLE from the AWS Marketplace
First steps to install DLE from the AWS Marketplace are trivial:
- Log in into AWS: https://console.aws.amazon.com/
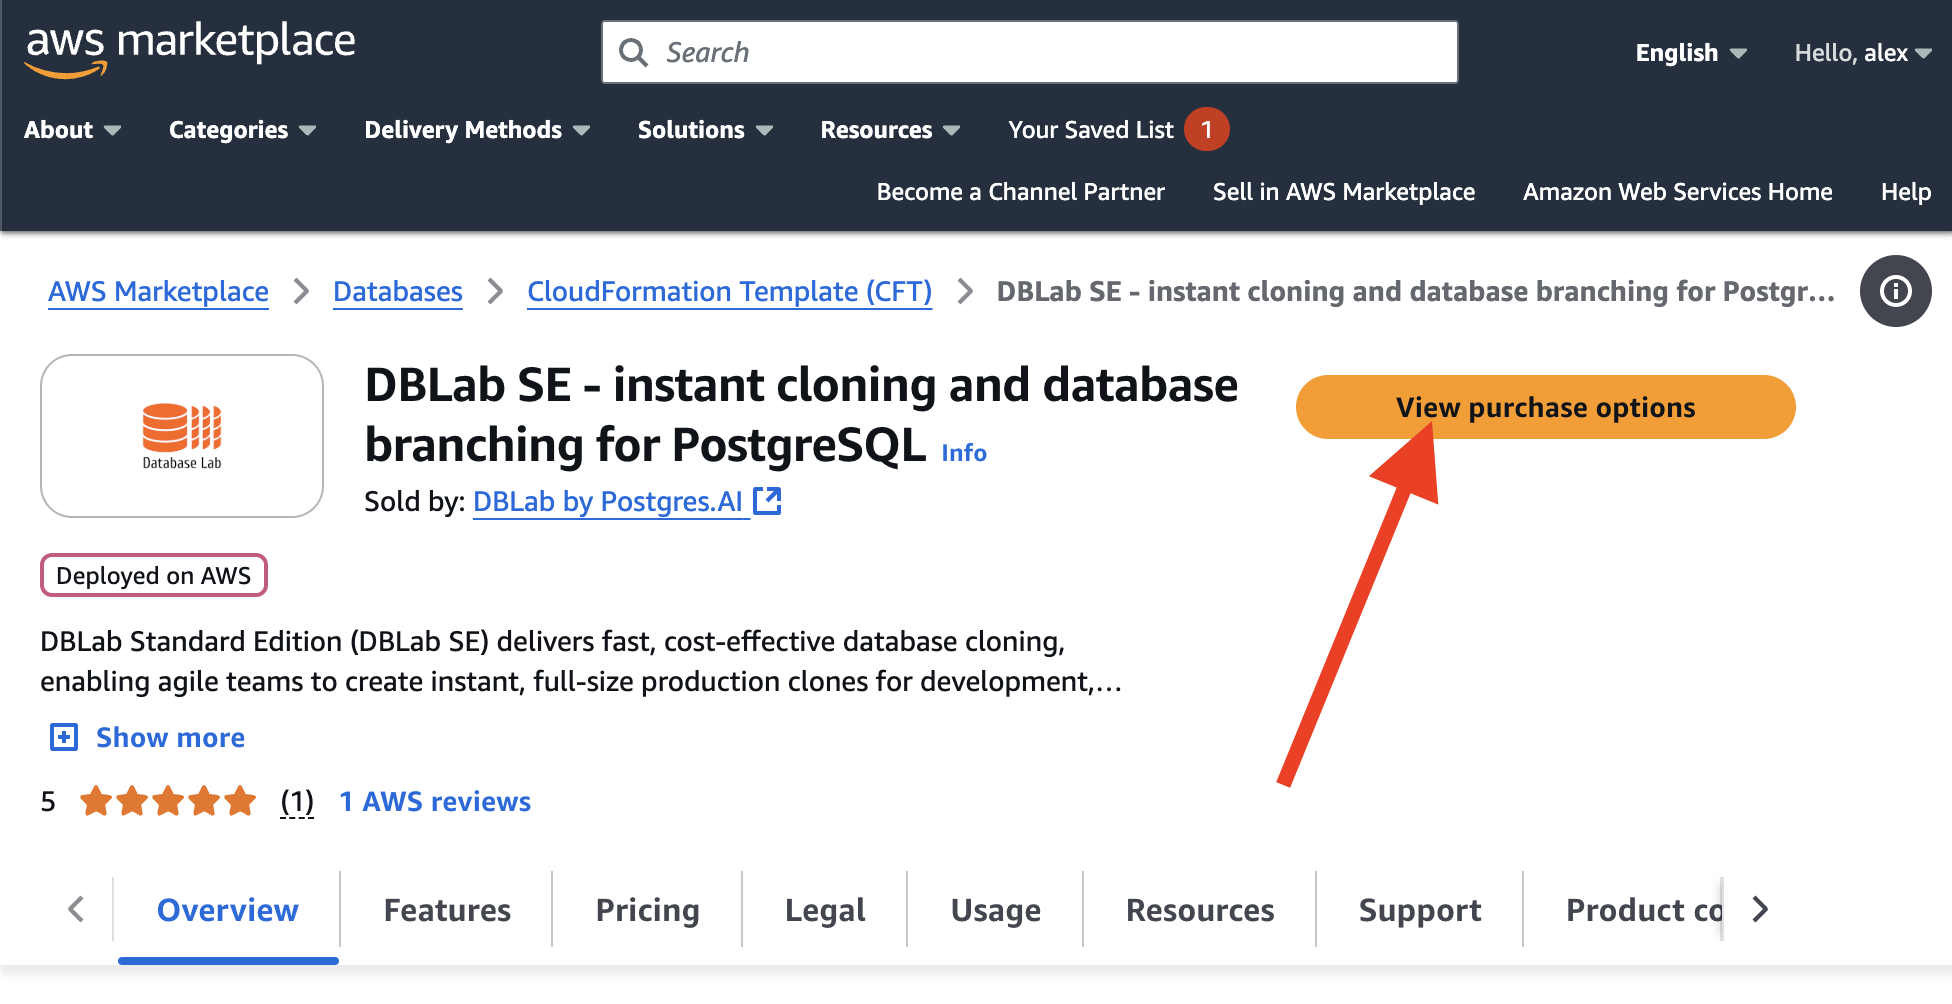
- Open the DBLab on AWS Marketplace page
And press the "View purchase options" button:
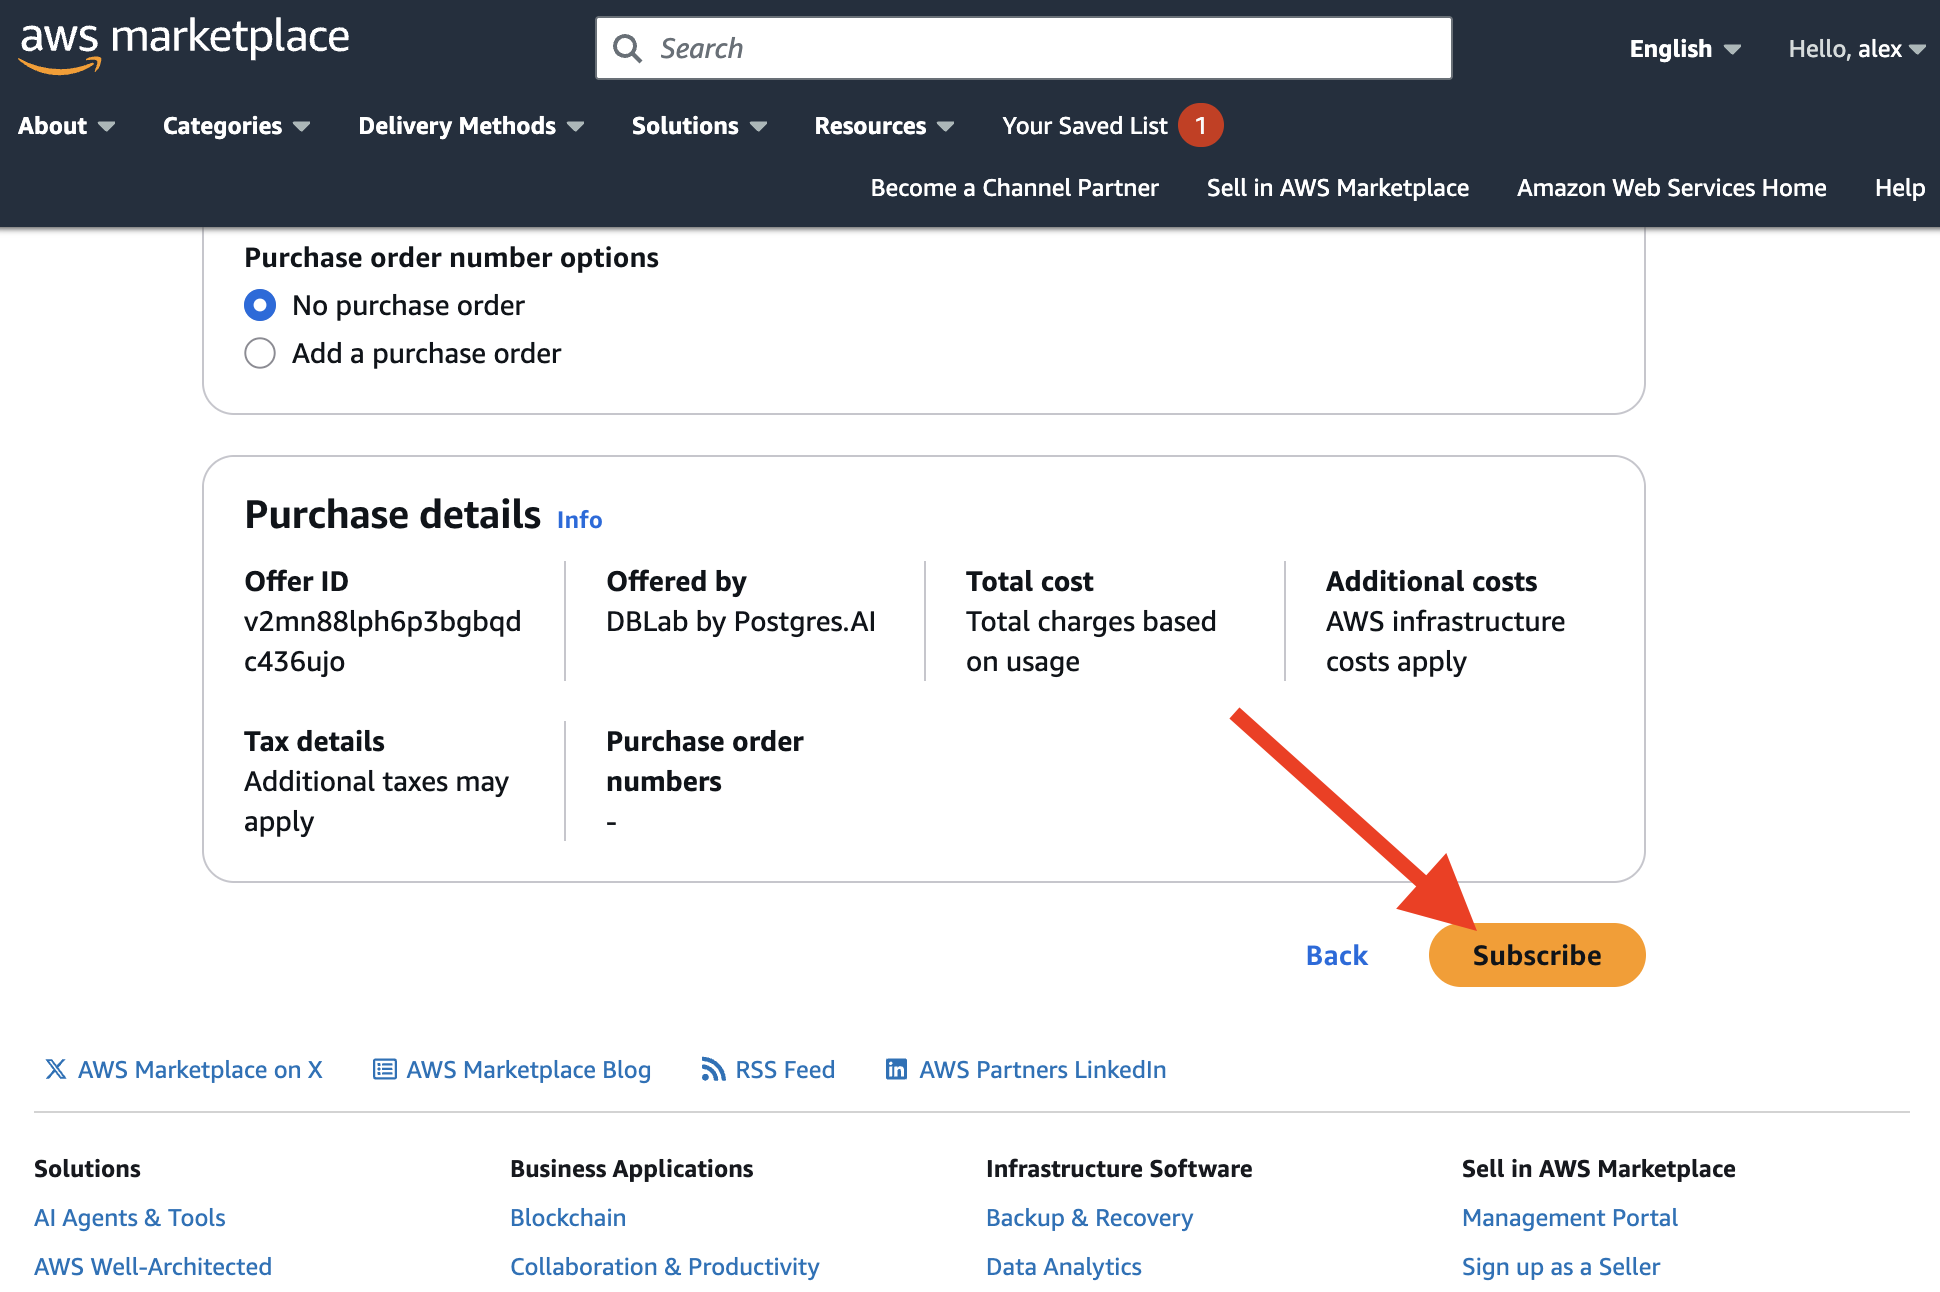
Then, press "Subscribe":
Next, press "Launch your software":

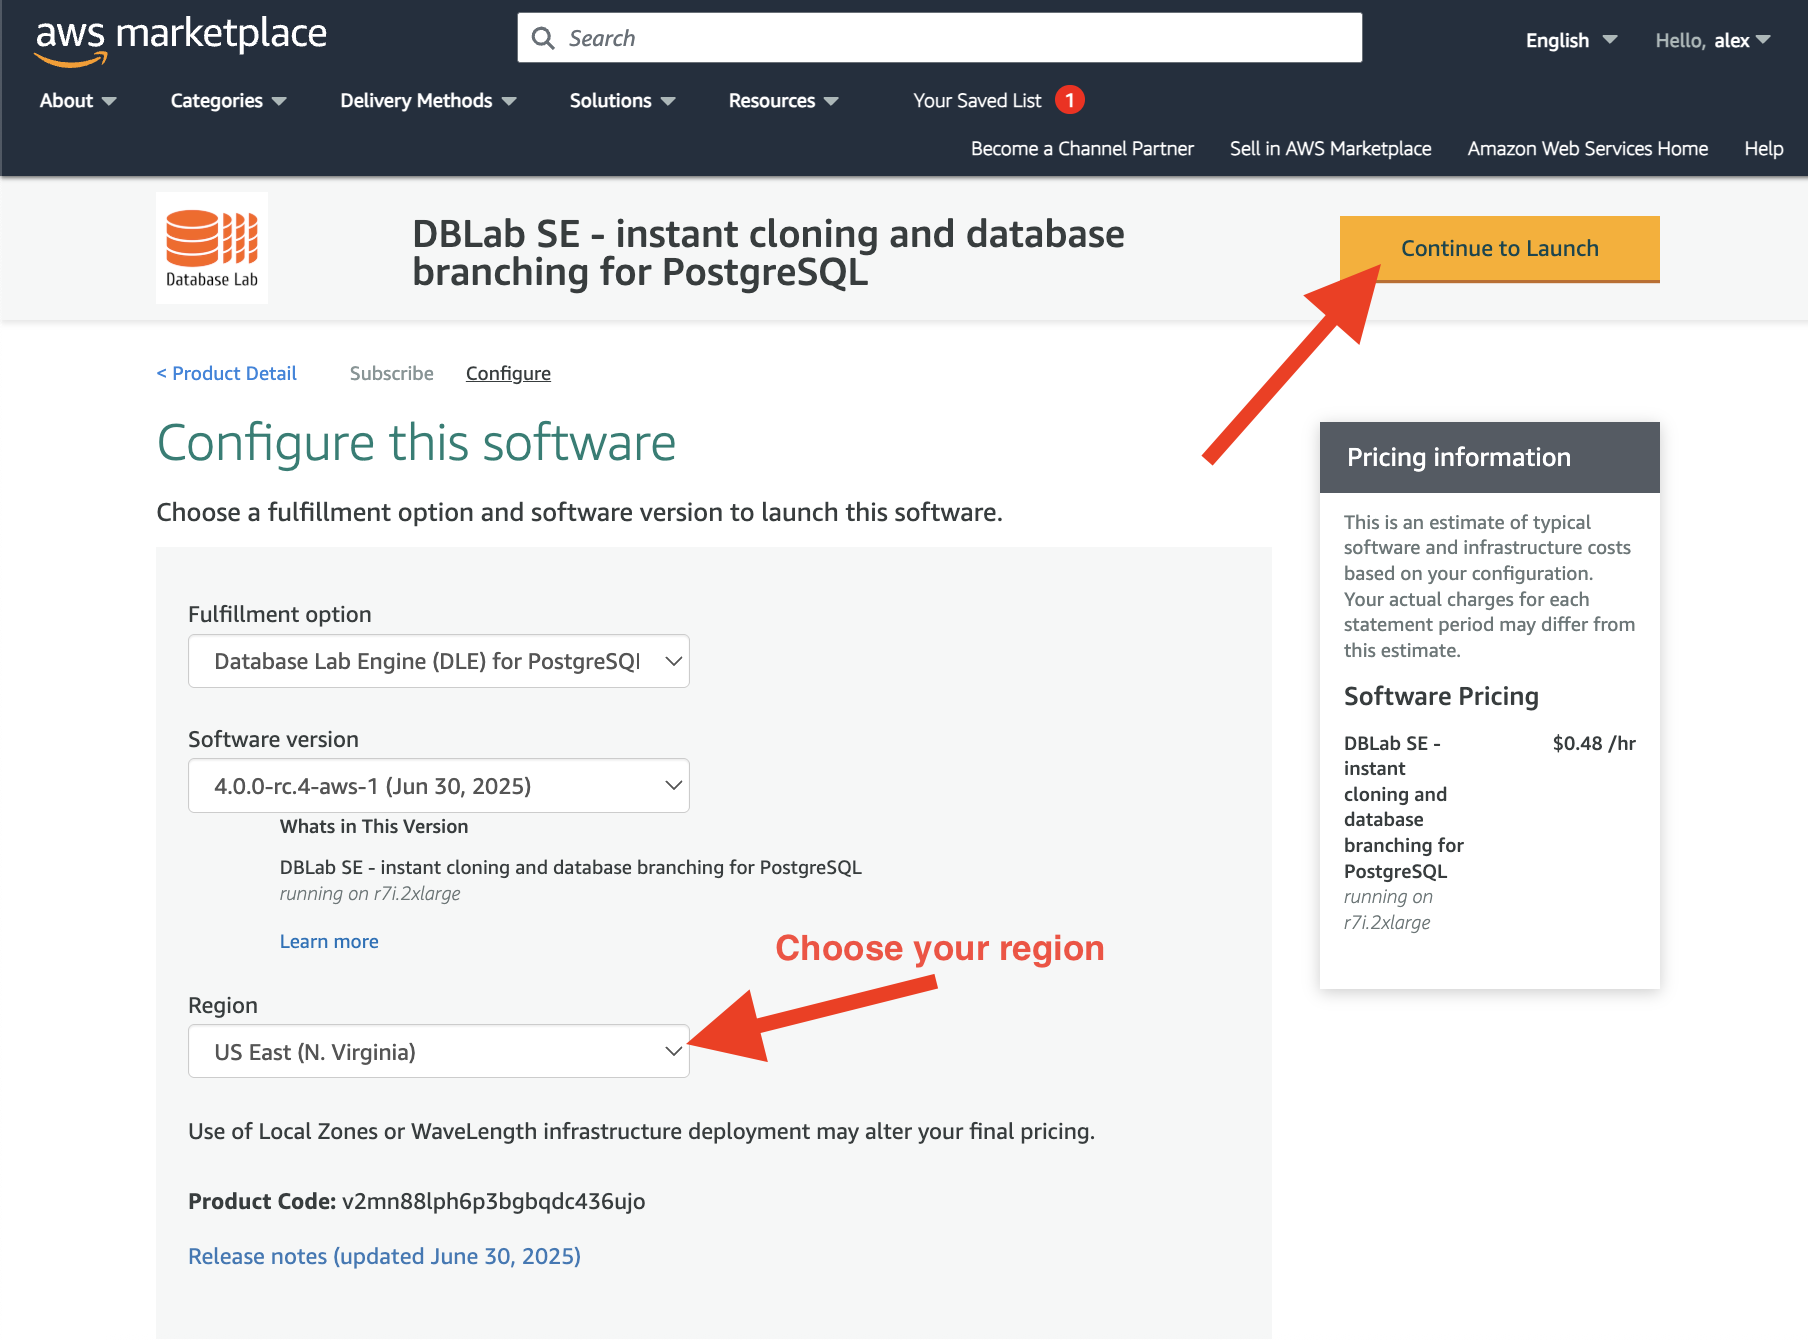
Now, check that the DBLab Engine version (the latest is recommended) and the AWS regions are chosen correctly, then press "Continue to Launch":
On this page you need to choose "Launch CloudFormation" and press "Launch":

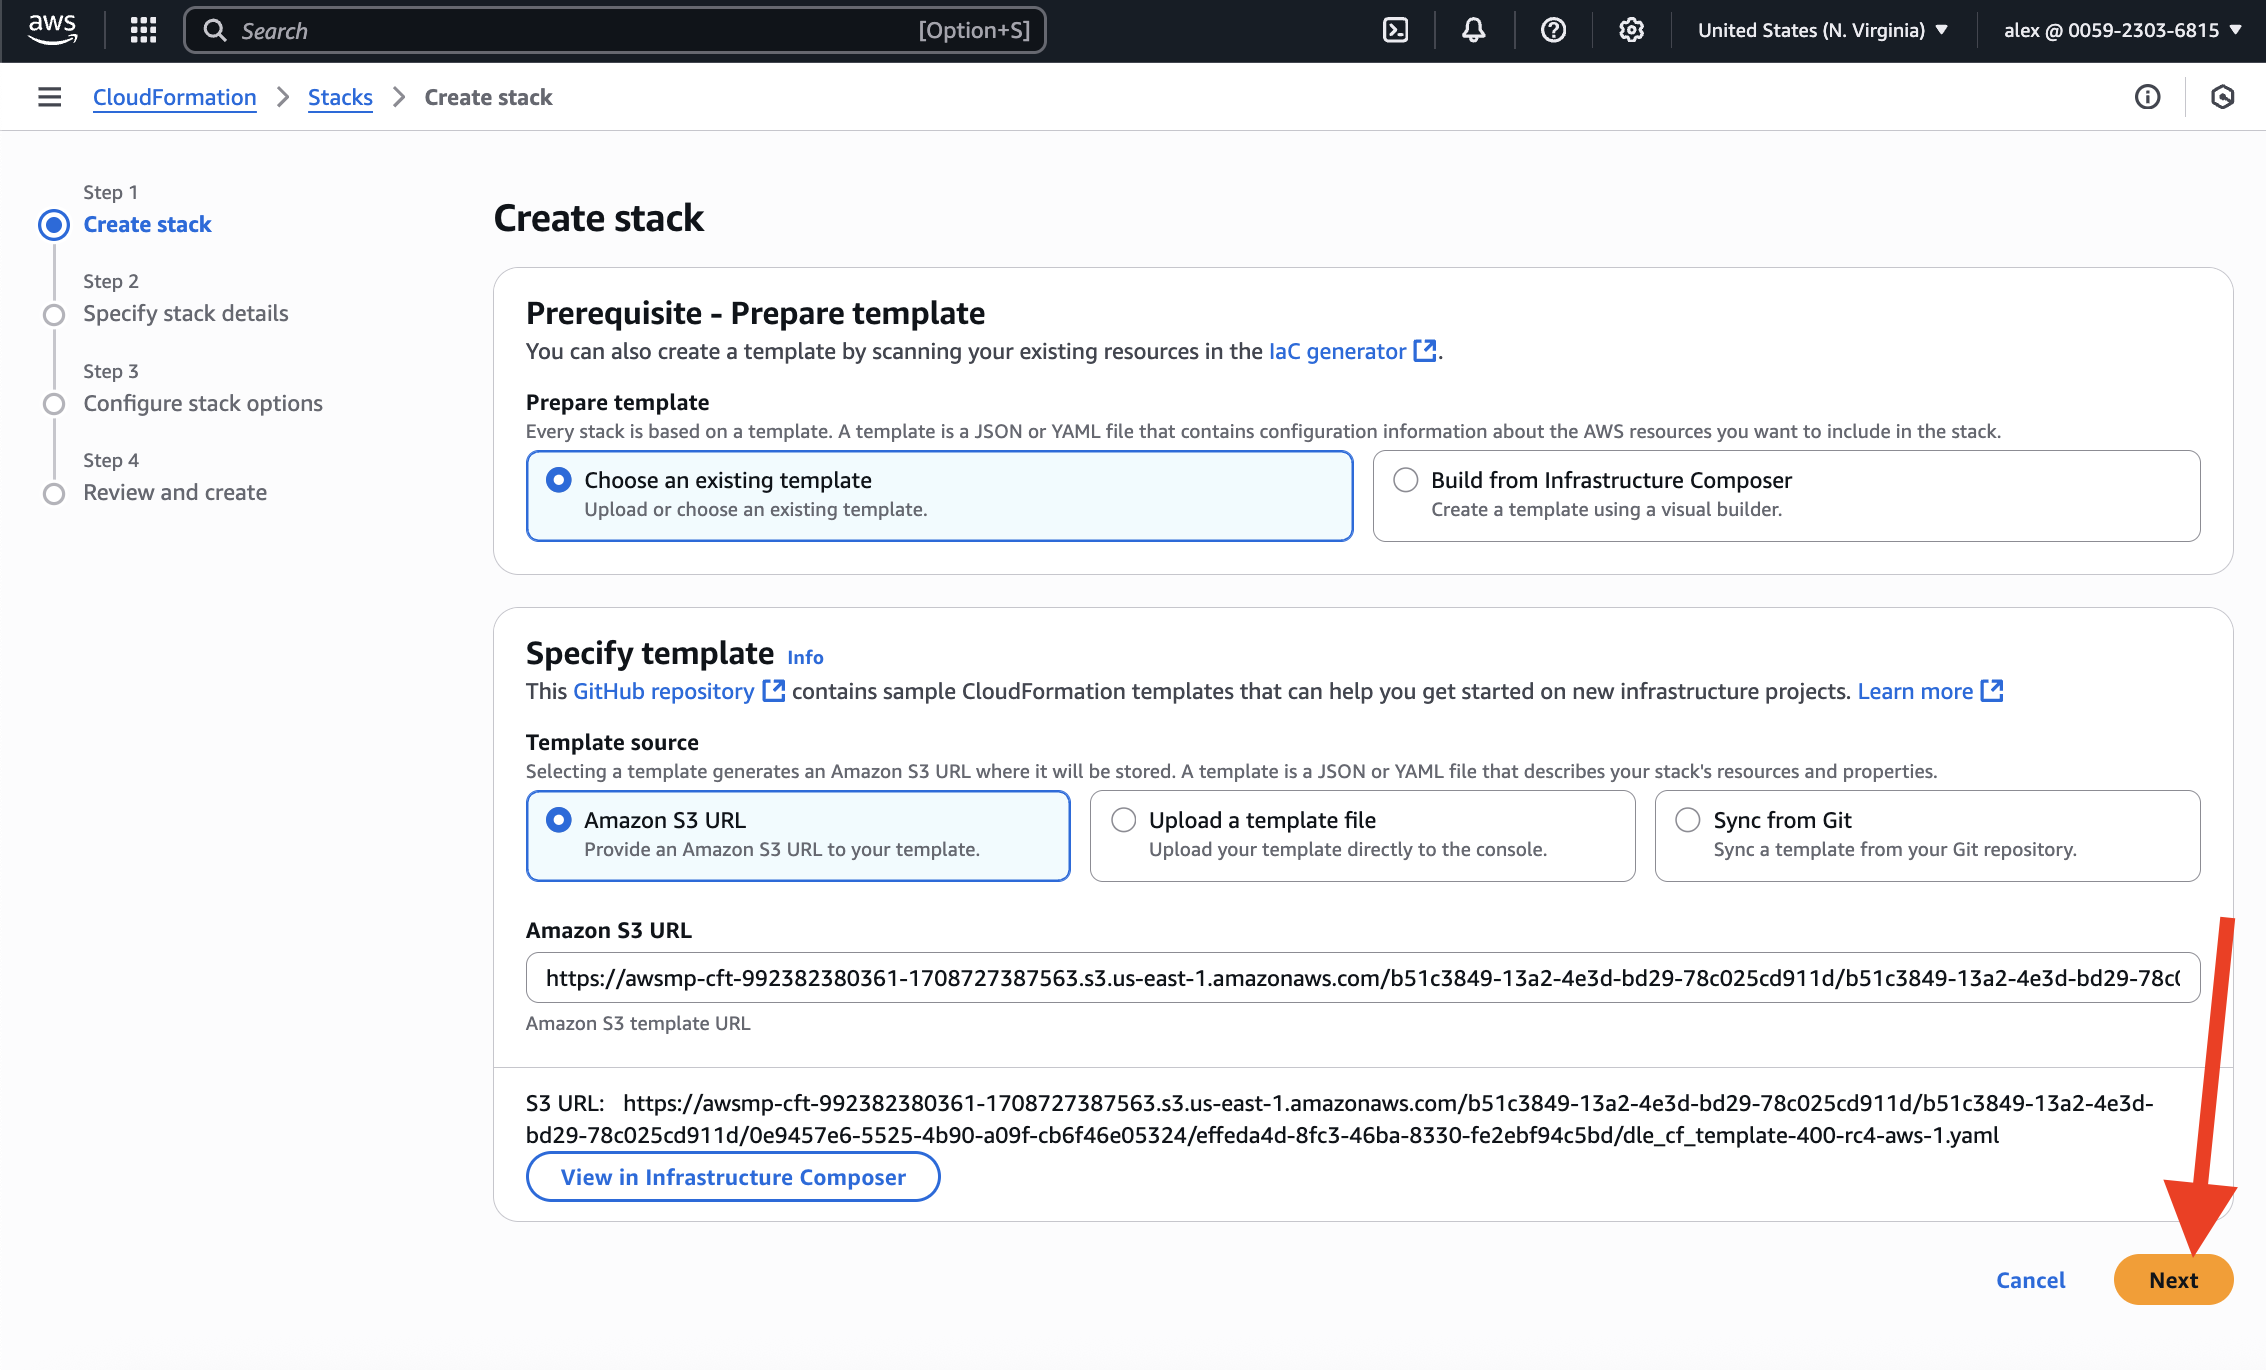
This page should be left unmodified, just press the "Next" button:
Now, it is time to fill the form that defines the AWS resources that we need:
- EC2 instance type and size – it defines the hourly price for "compute" (see the full price list);
- subnet mask to restrict connections (for testing, you can use
0.0.0.0/0; for production use, restrict connections wisely); - VPC and subnet – you can choose any of them if you're testing DBLab for some database which is publicly available (the only thing to remember: subnet belongs to a VPC, so make sure they match); for production database, you need to choose those options that will allow DBLab to connect to the source for the successful data retrieval process;
- choose your AWS key pair (has to be created already).
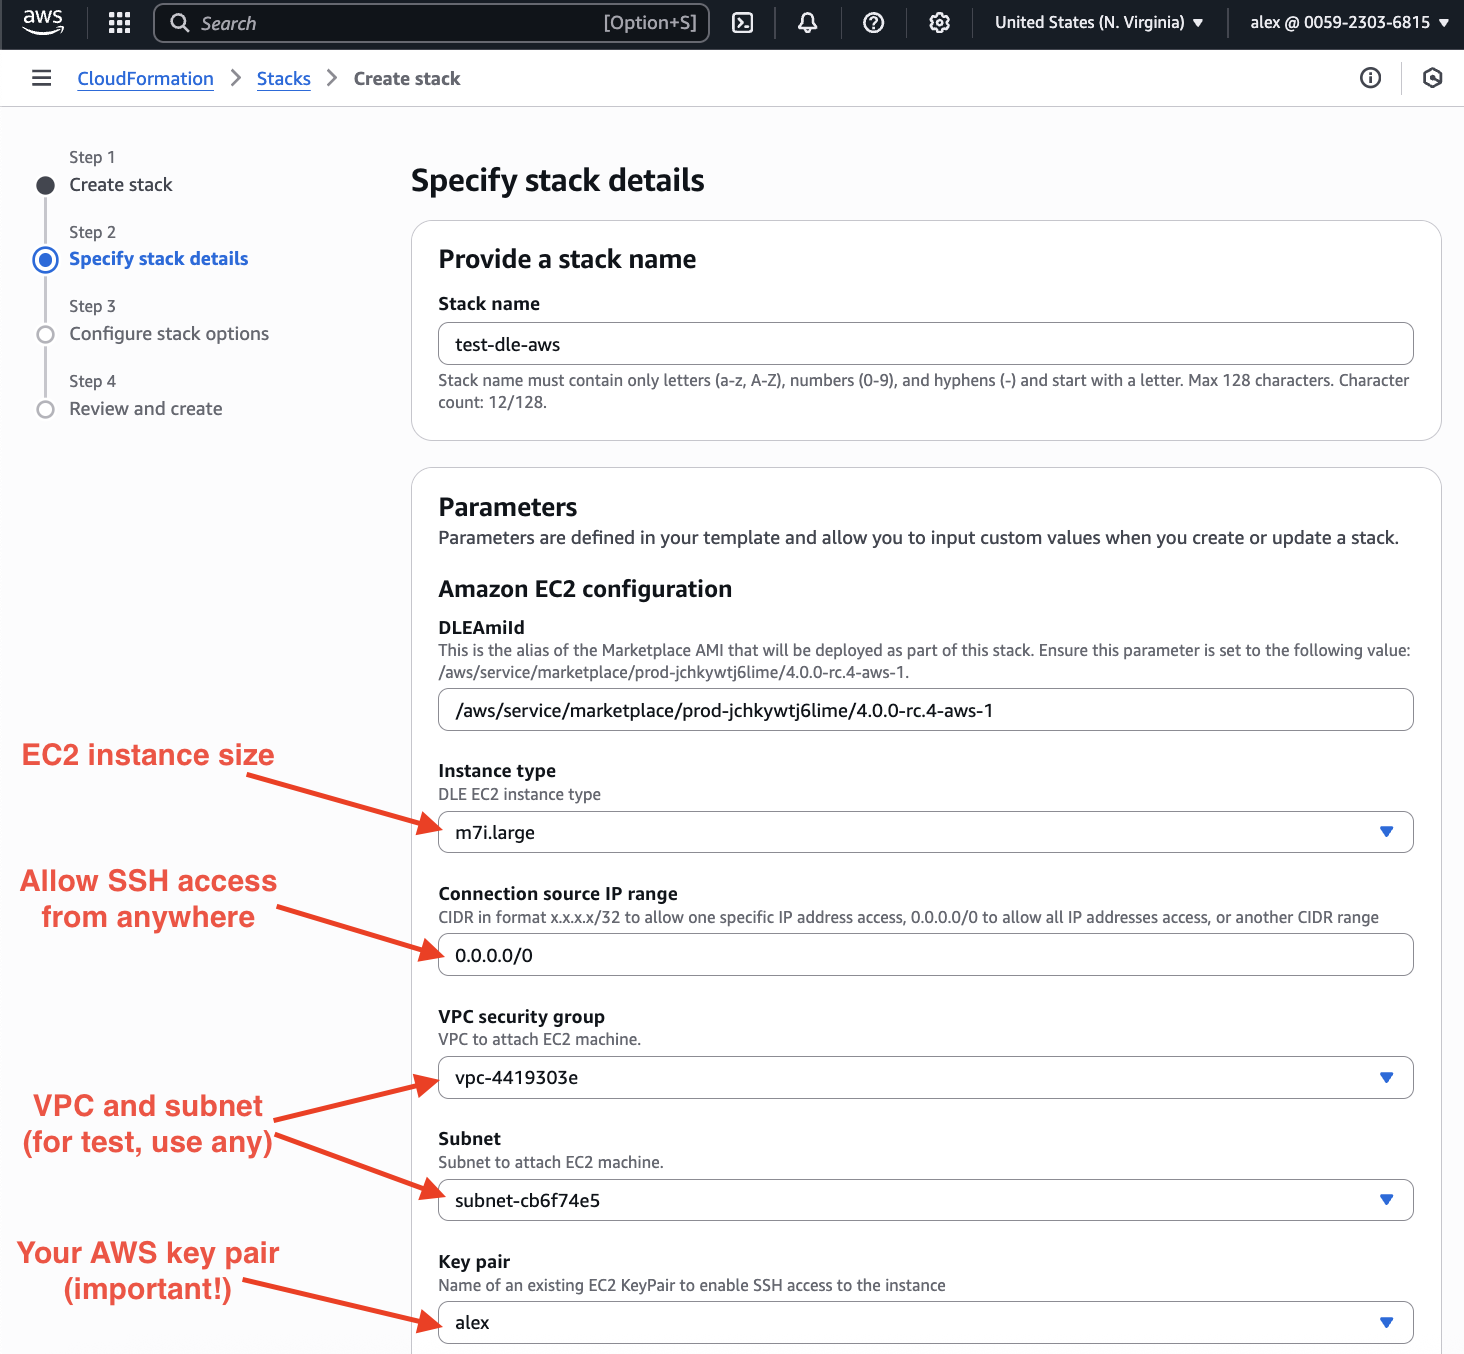
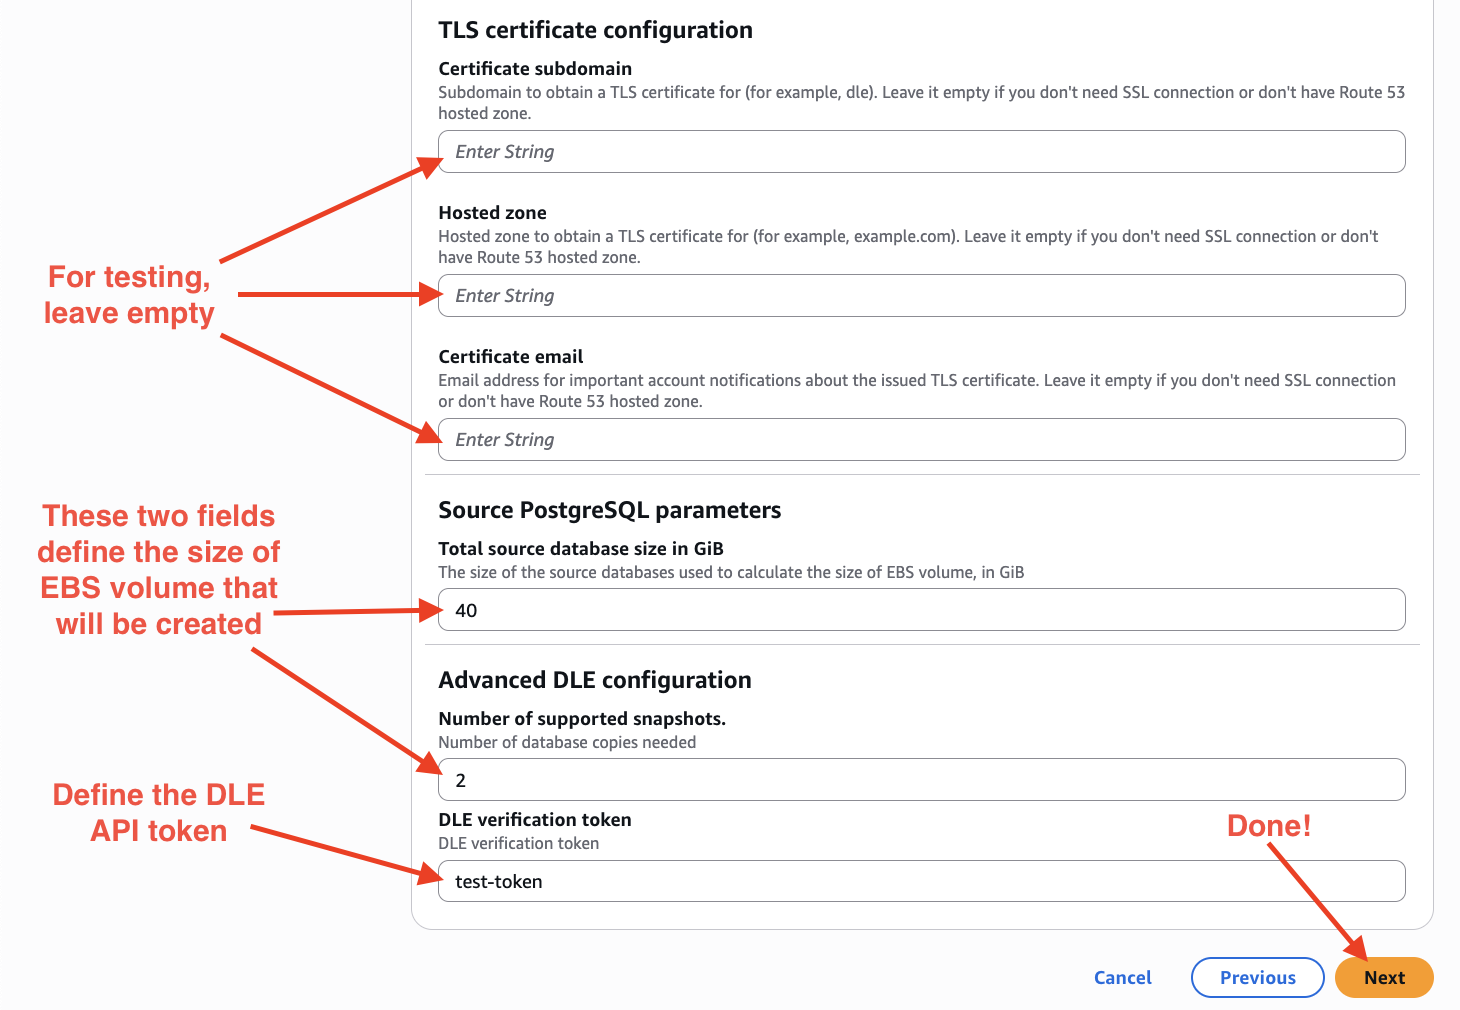
Next, on the same page:
- define the size of EBS volume that will be created (you can find pricing calculator here: "Amazon EBS pricing"):
- put as many GiB as roughly your database has (it is always possible to add more space without downtime),
- define how many snapshots you'll be needed (minimum 2);
- define secret token (at least 9 characters are required!) – it will be used to communicate with DBLab API, CLI, and UI.
Then, press "Next".
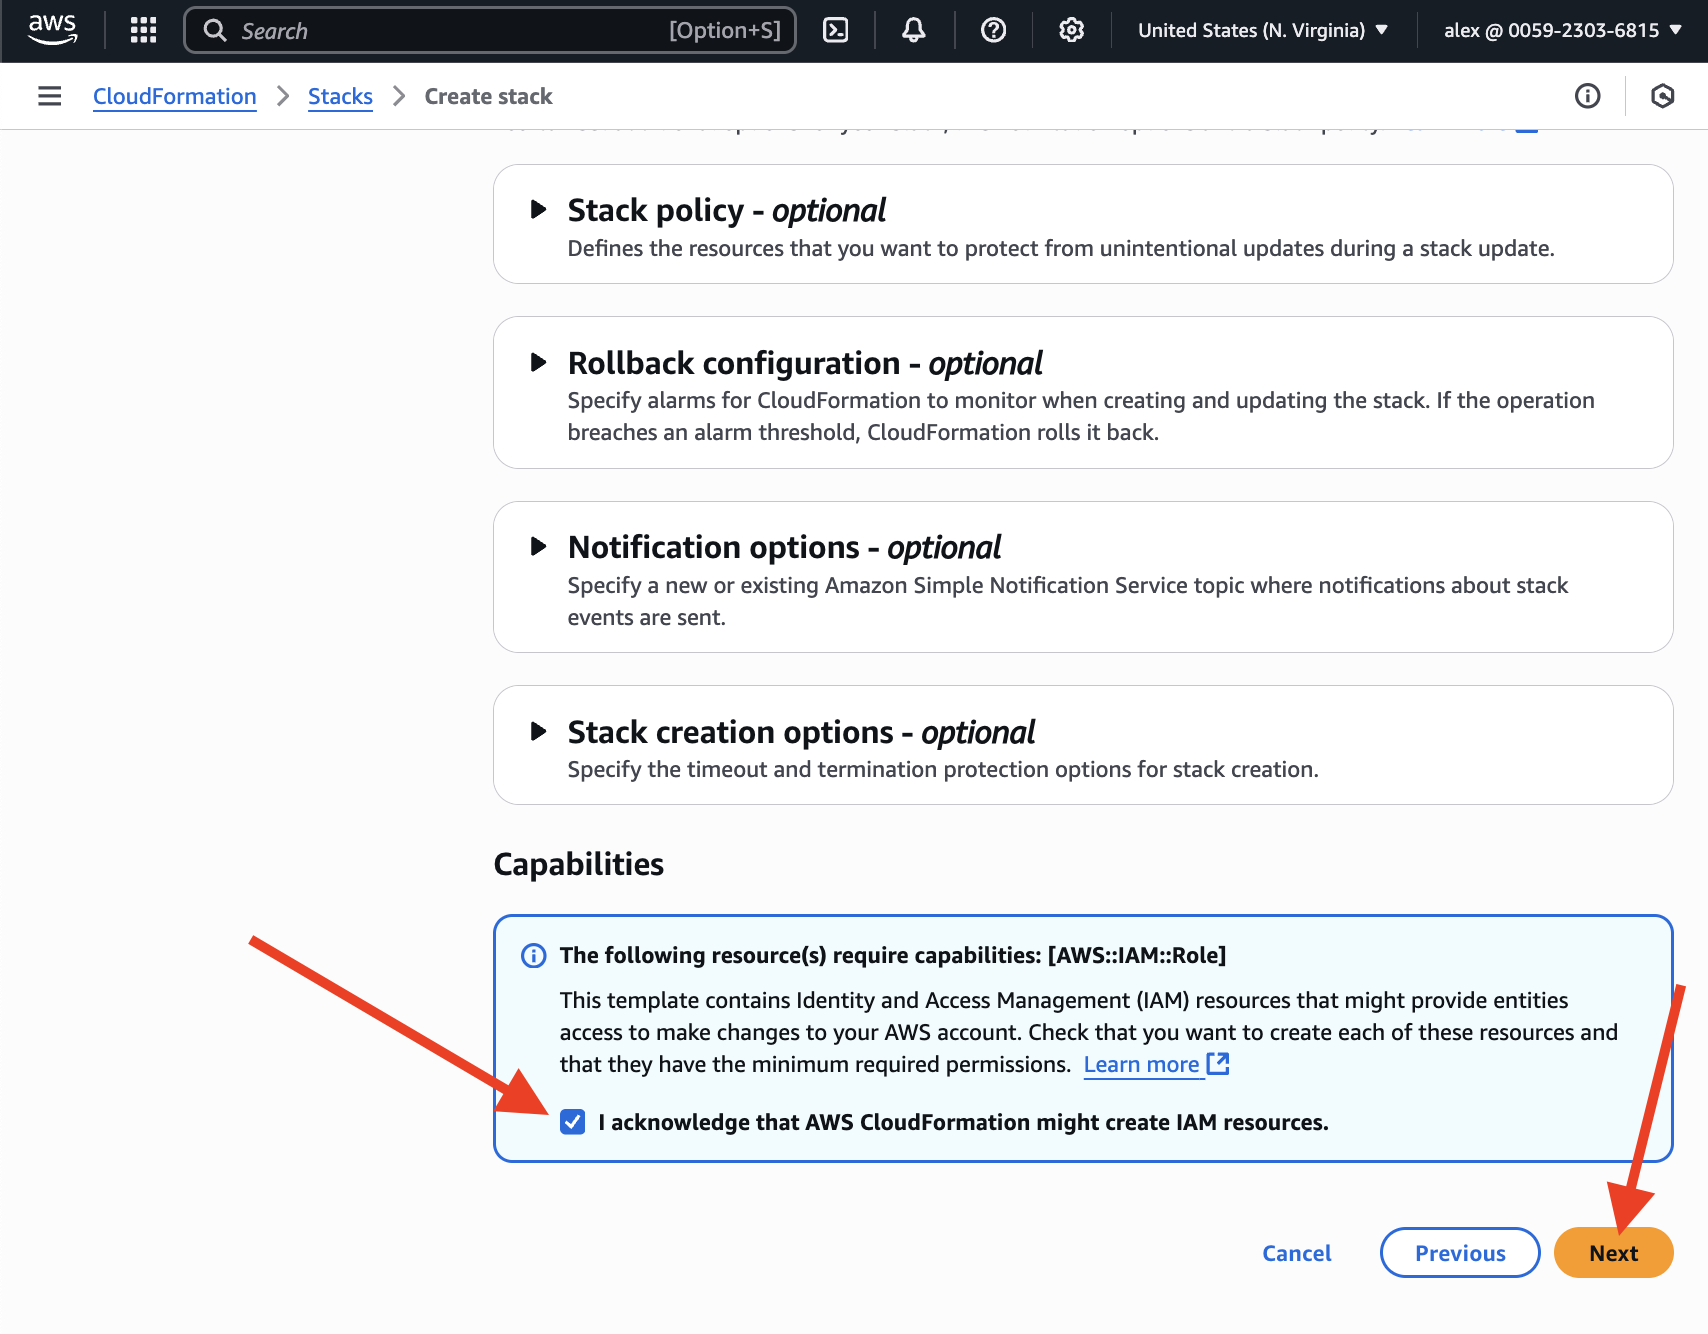
At the bottom of the next page acknowledge that AWS CloudFormation might create IAM resources. Then, press the "Next" button:
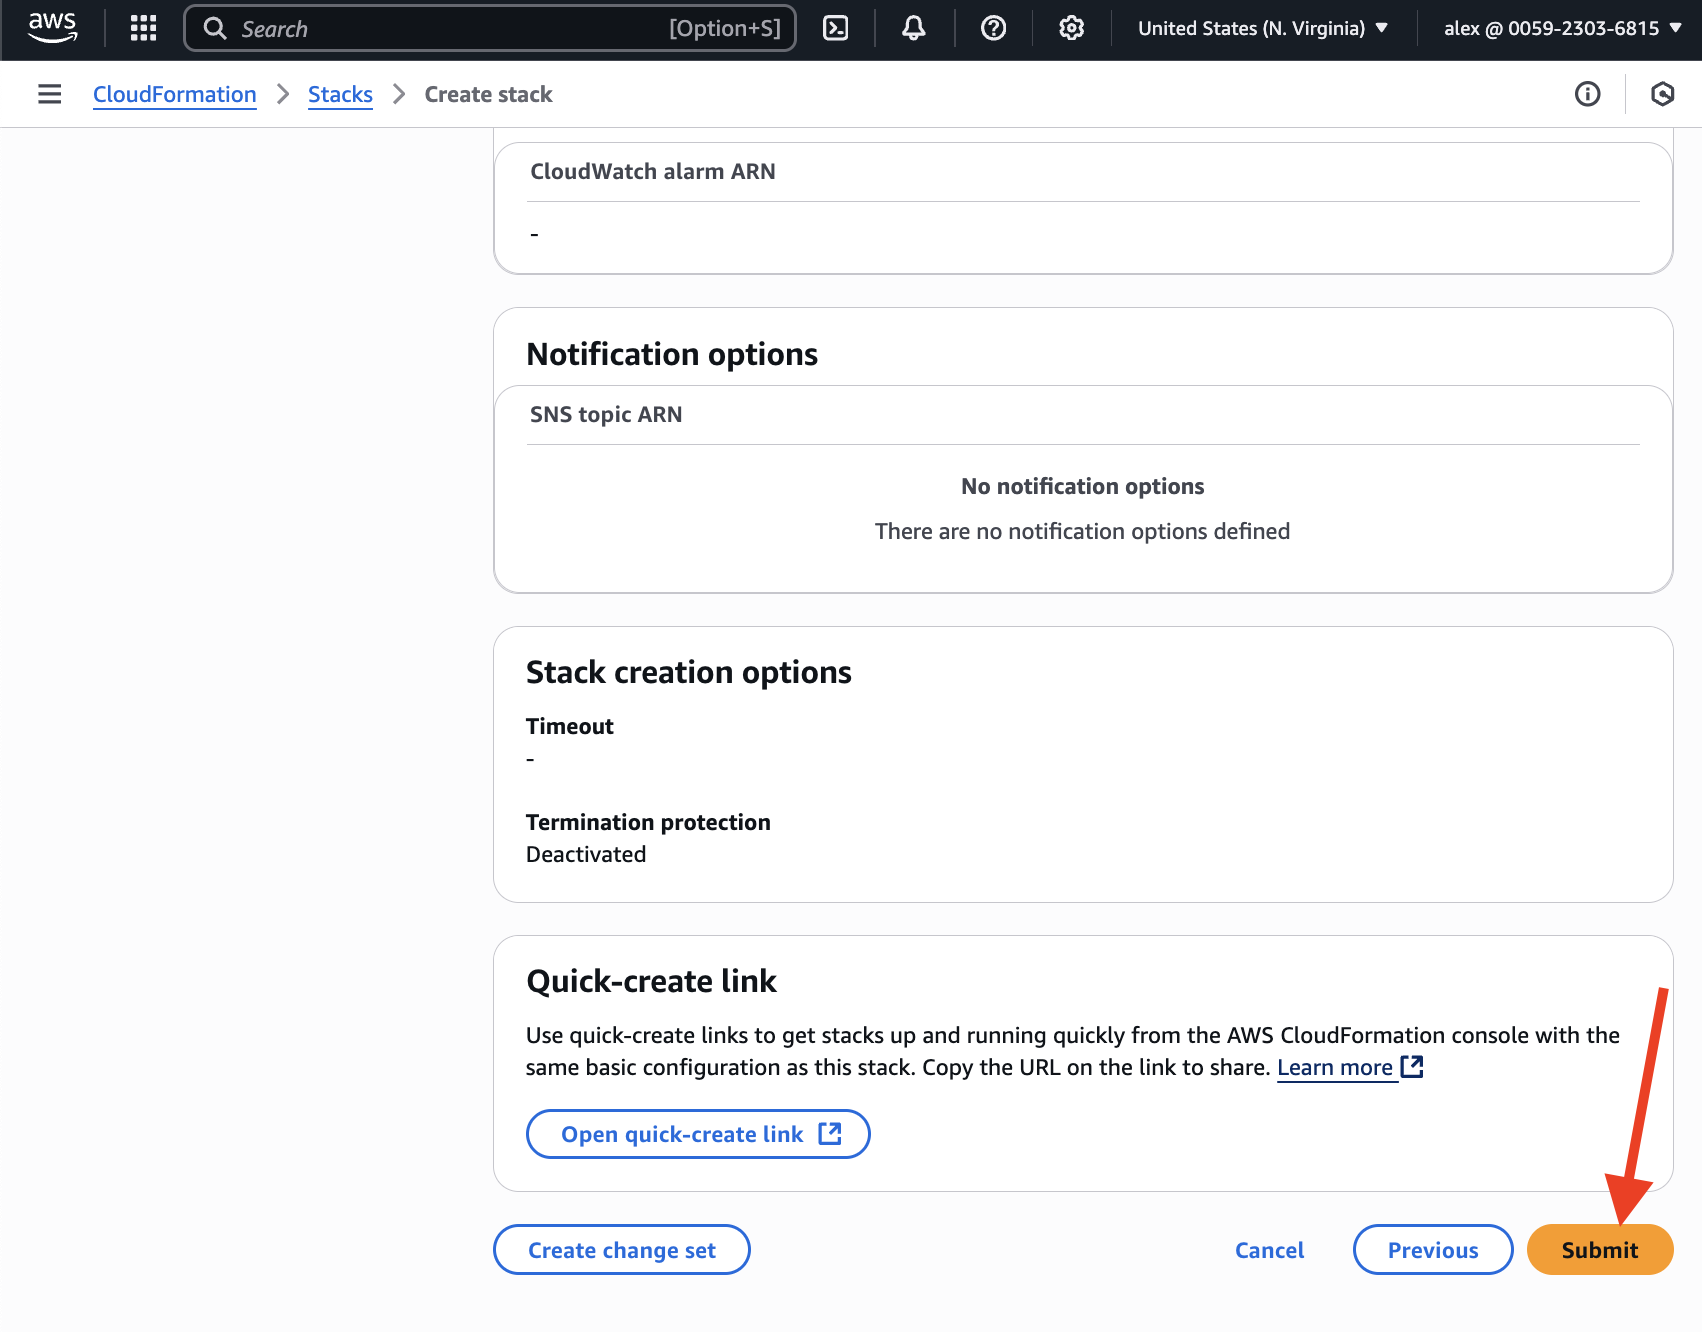
Once you've pressed "Submit", the process begins.
You need to wait a few minutes while all resources are being provisioned. Check out the "Outputs" section periodically. Once DLE API and UI are ready, you should see the ordered list of instructions on how to connect to UI and API.
Step 2. Configure and launch the DBLab Engine
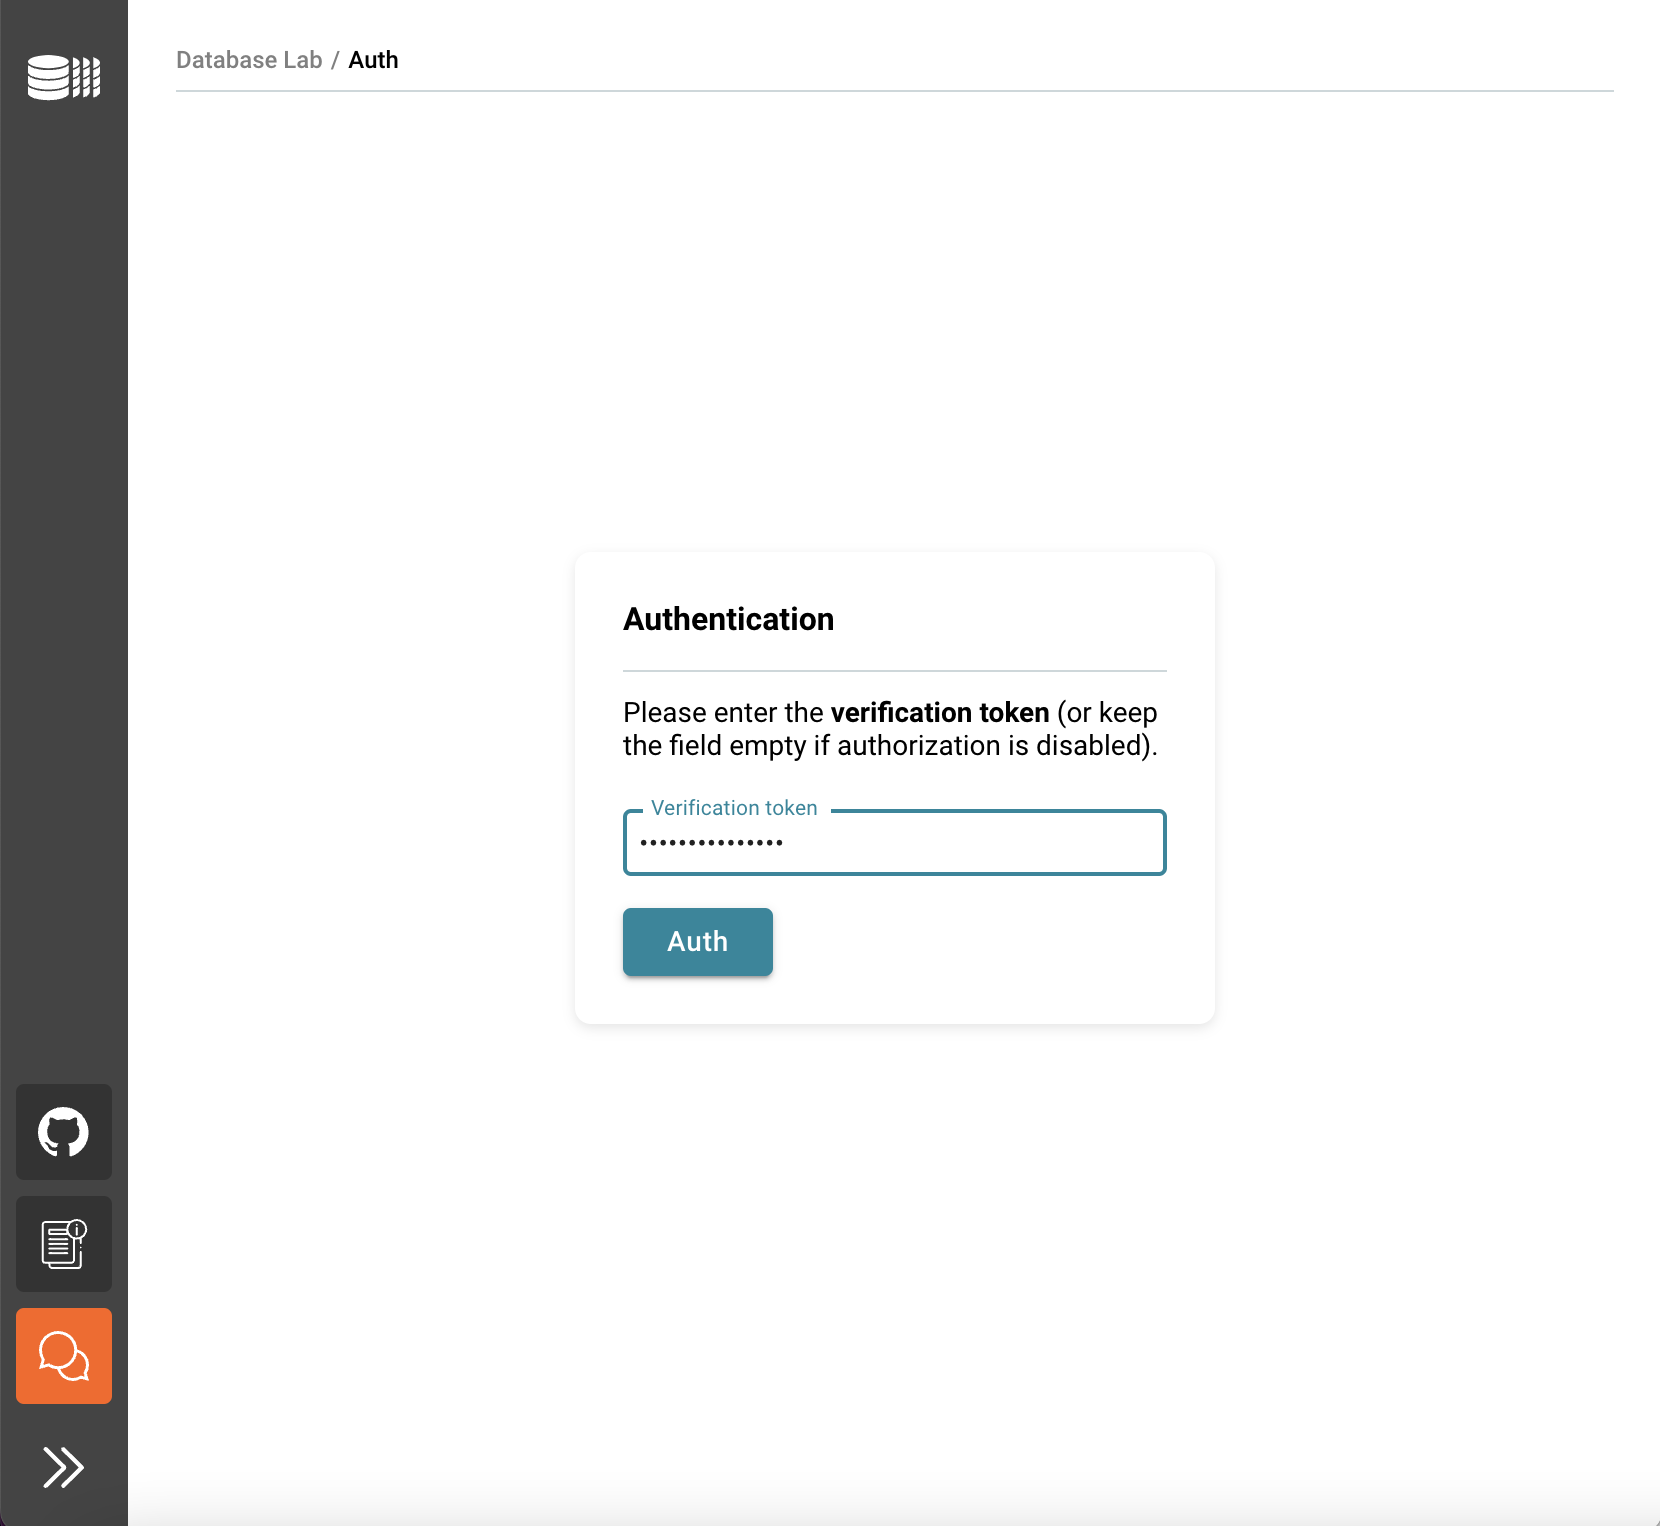
Enter the verification token, you have created earlier. You can also find it in the "Outputs" section.
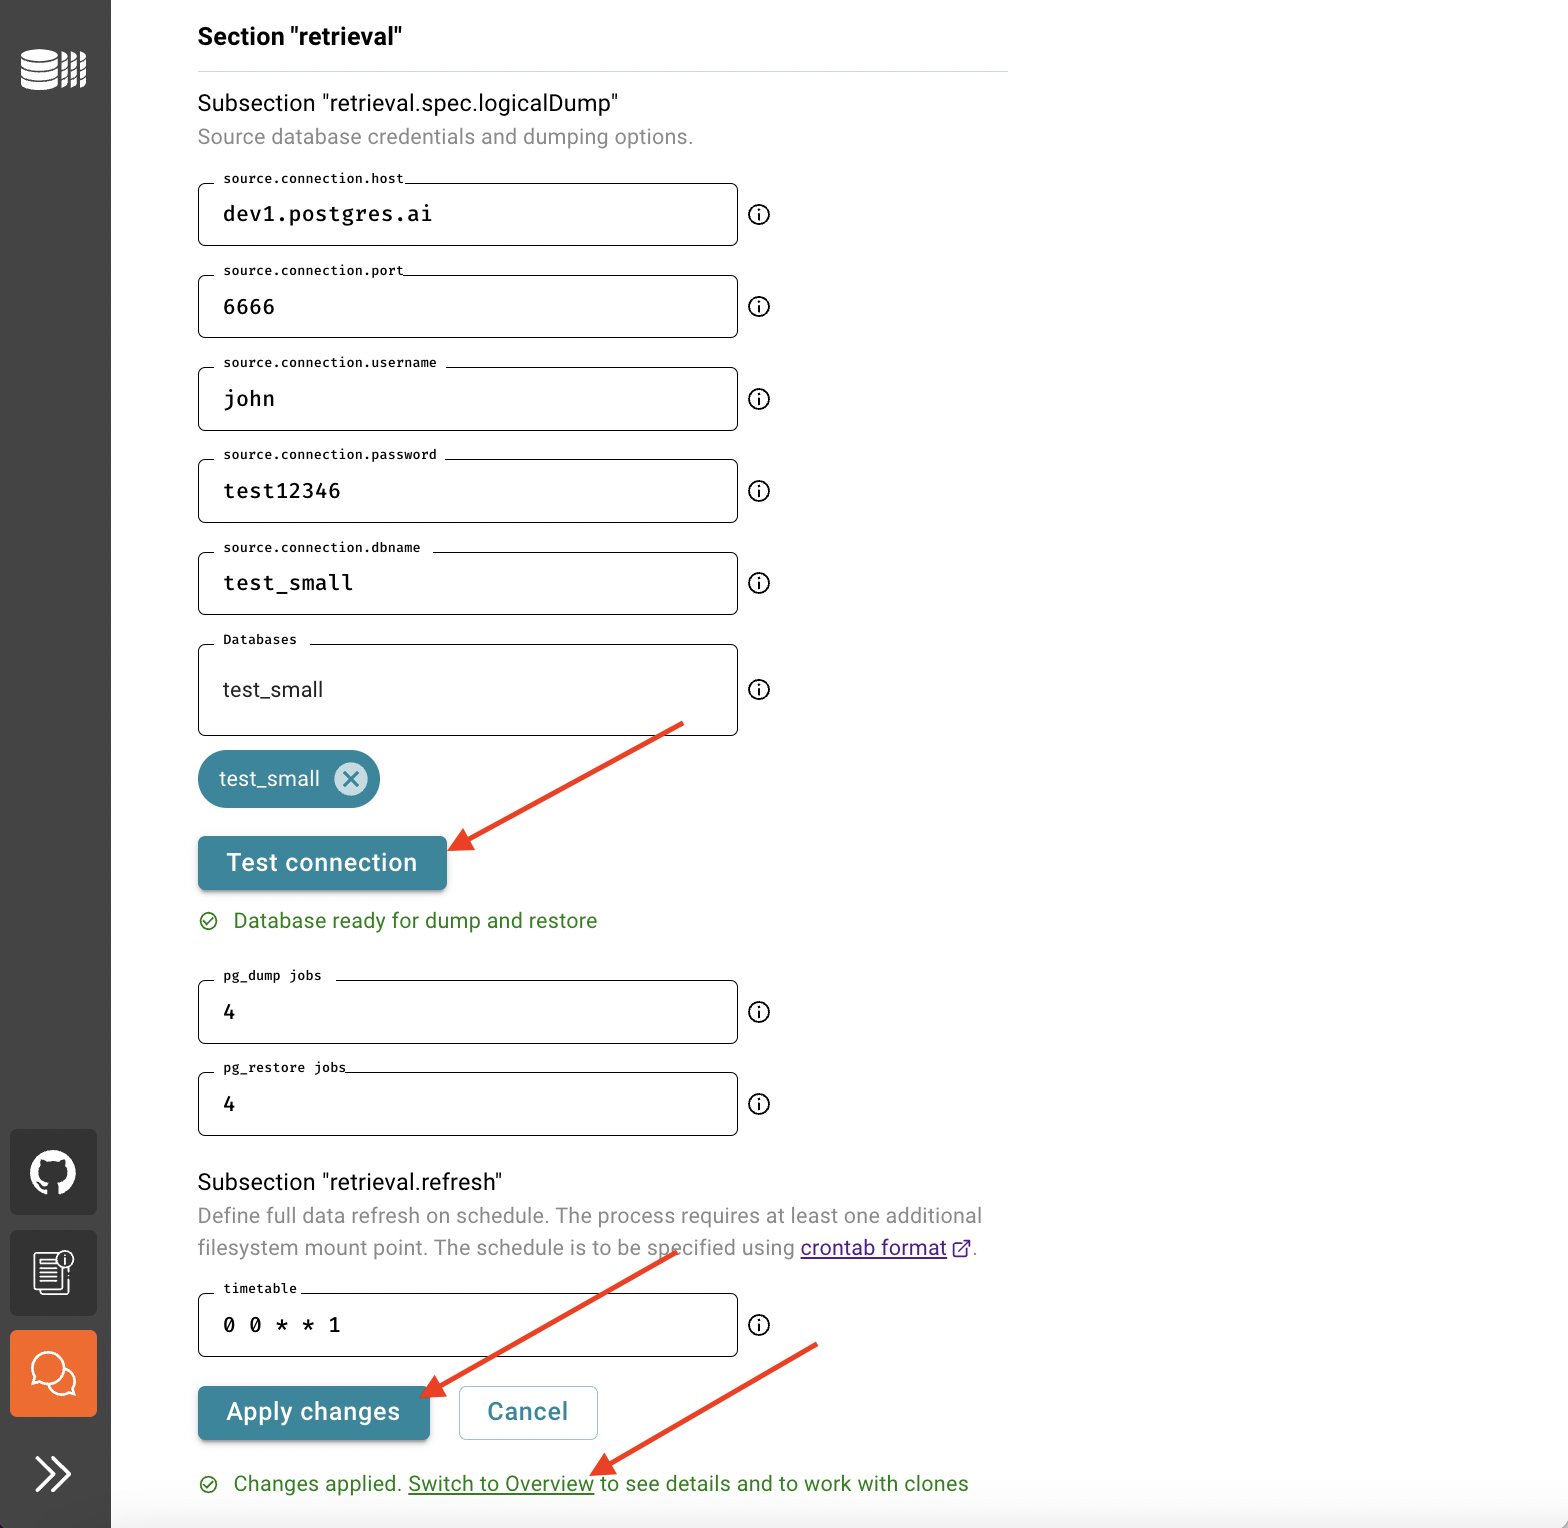
Now it's time to define DB credentials of the source to initiate database provisioning – this is how DLE will be initialized, performing the very first data retrieval, and then the same parameters will be used for scheduled full refreshes according to the schedule defined. Fill the forms, and use the information in the tooltips if needed.
Then press "Test connection". If your database is ready for dump and restore, save the form and press "Switch to Overview" to track the process of data retrieval.
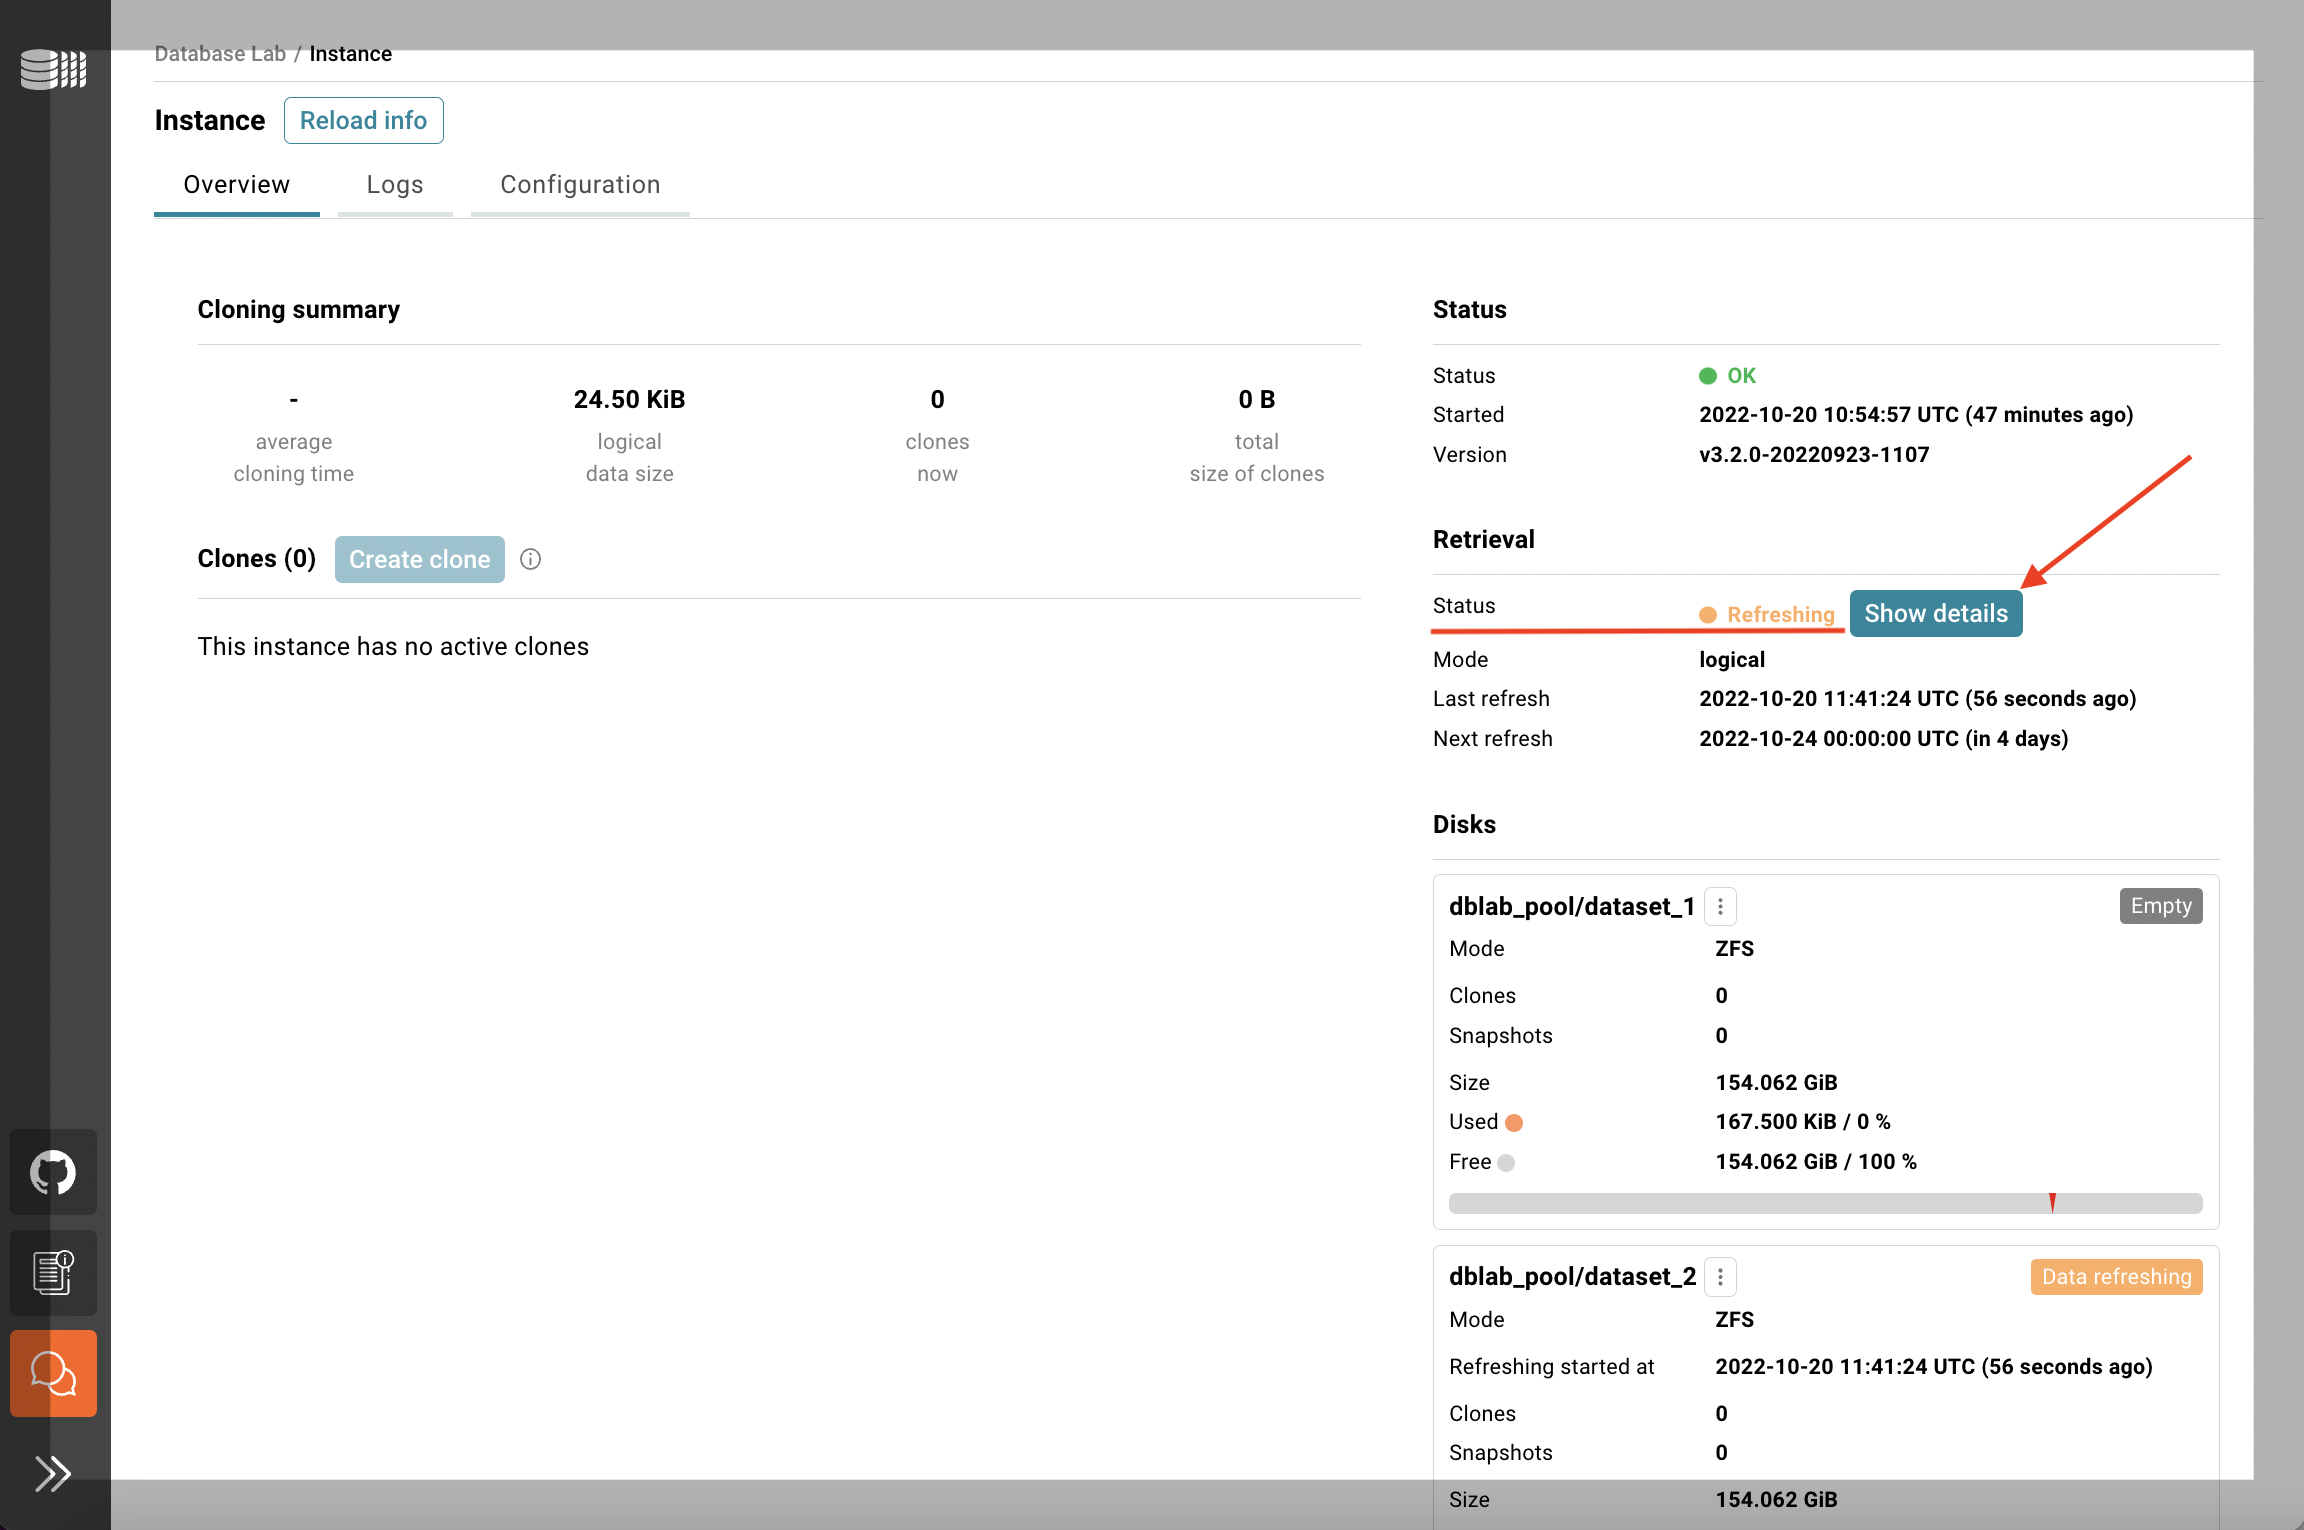
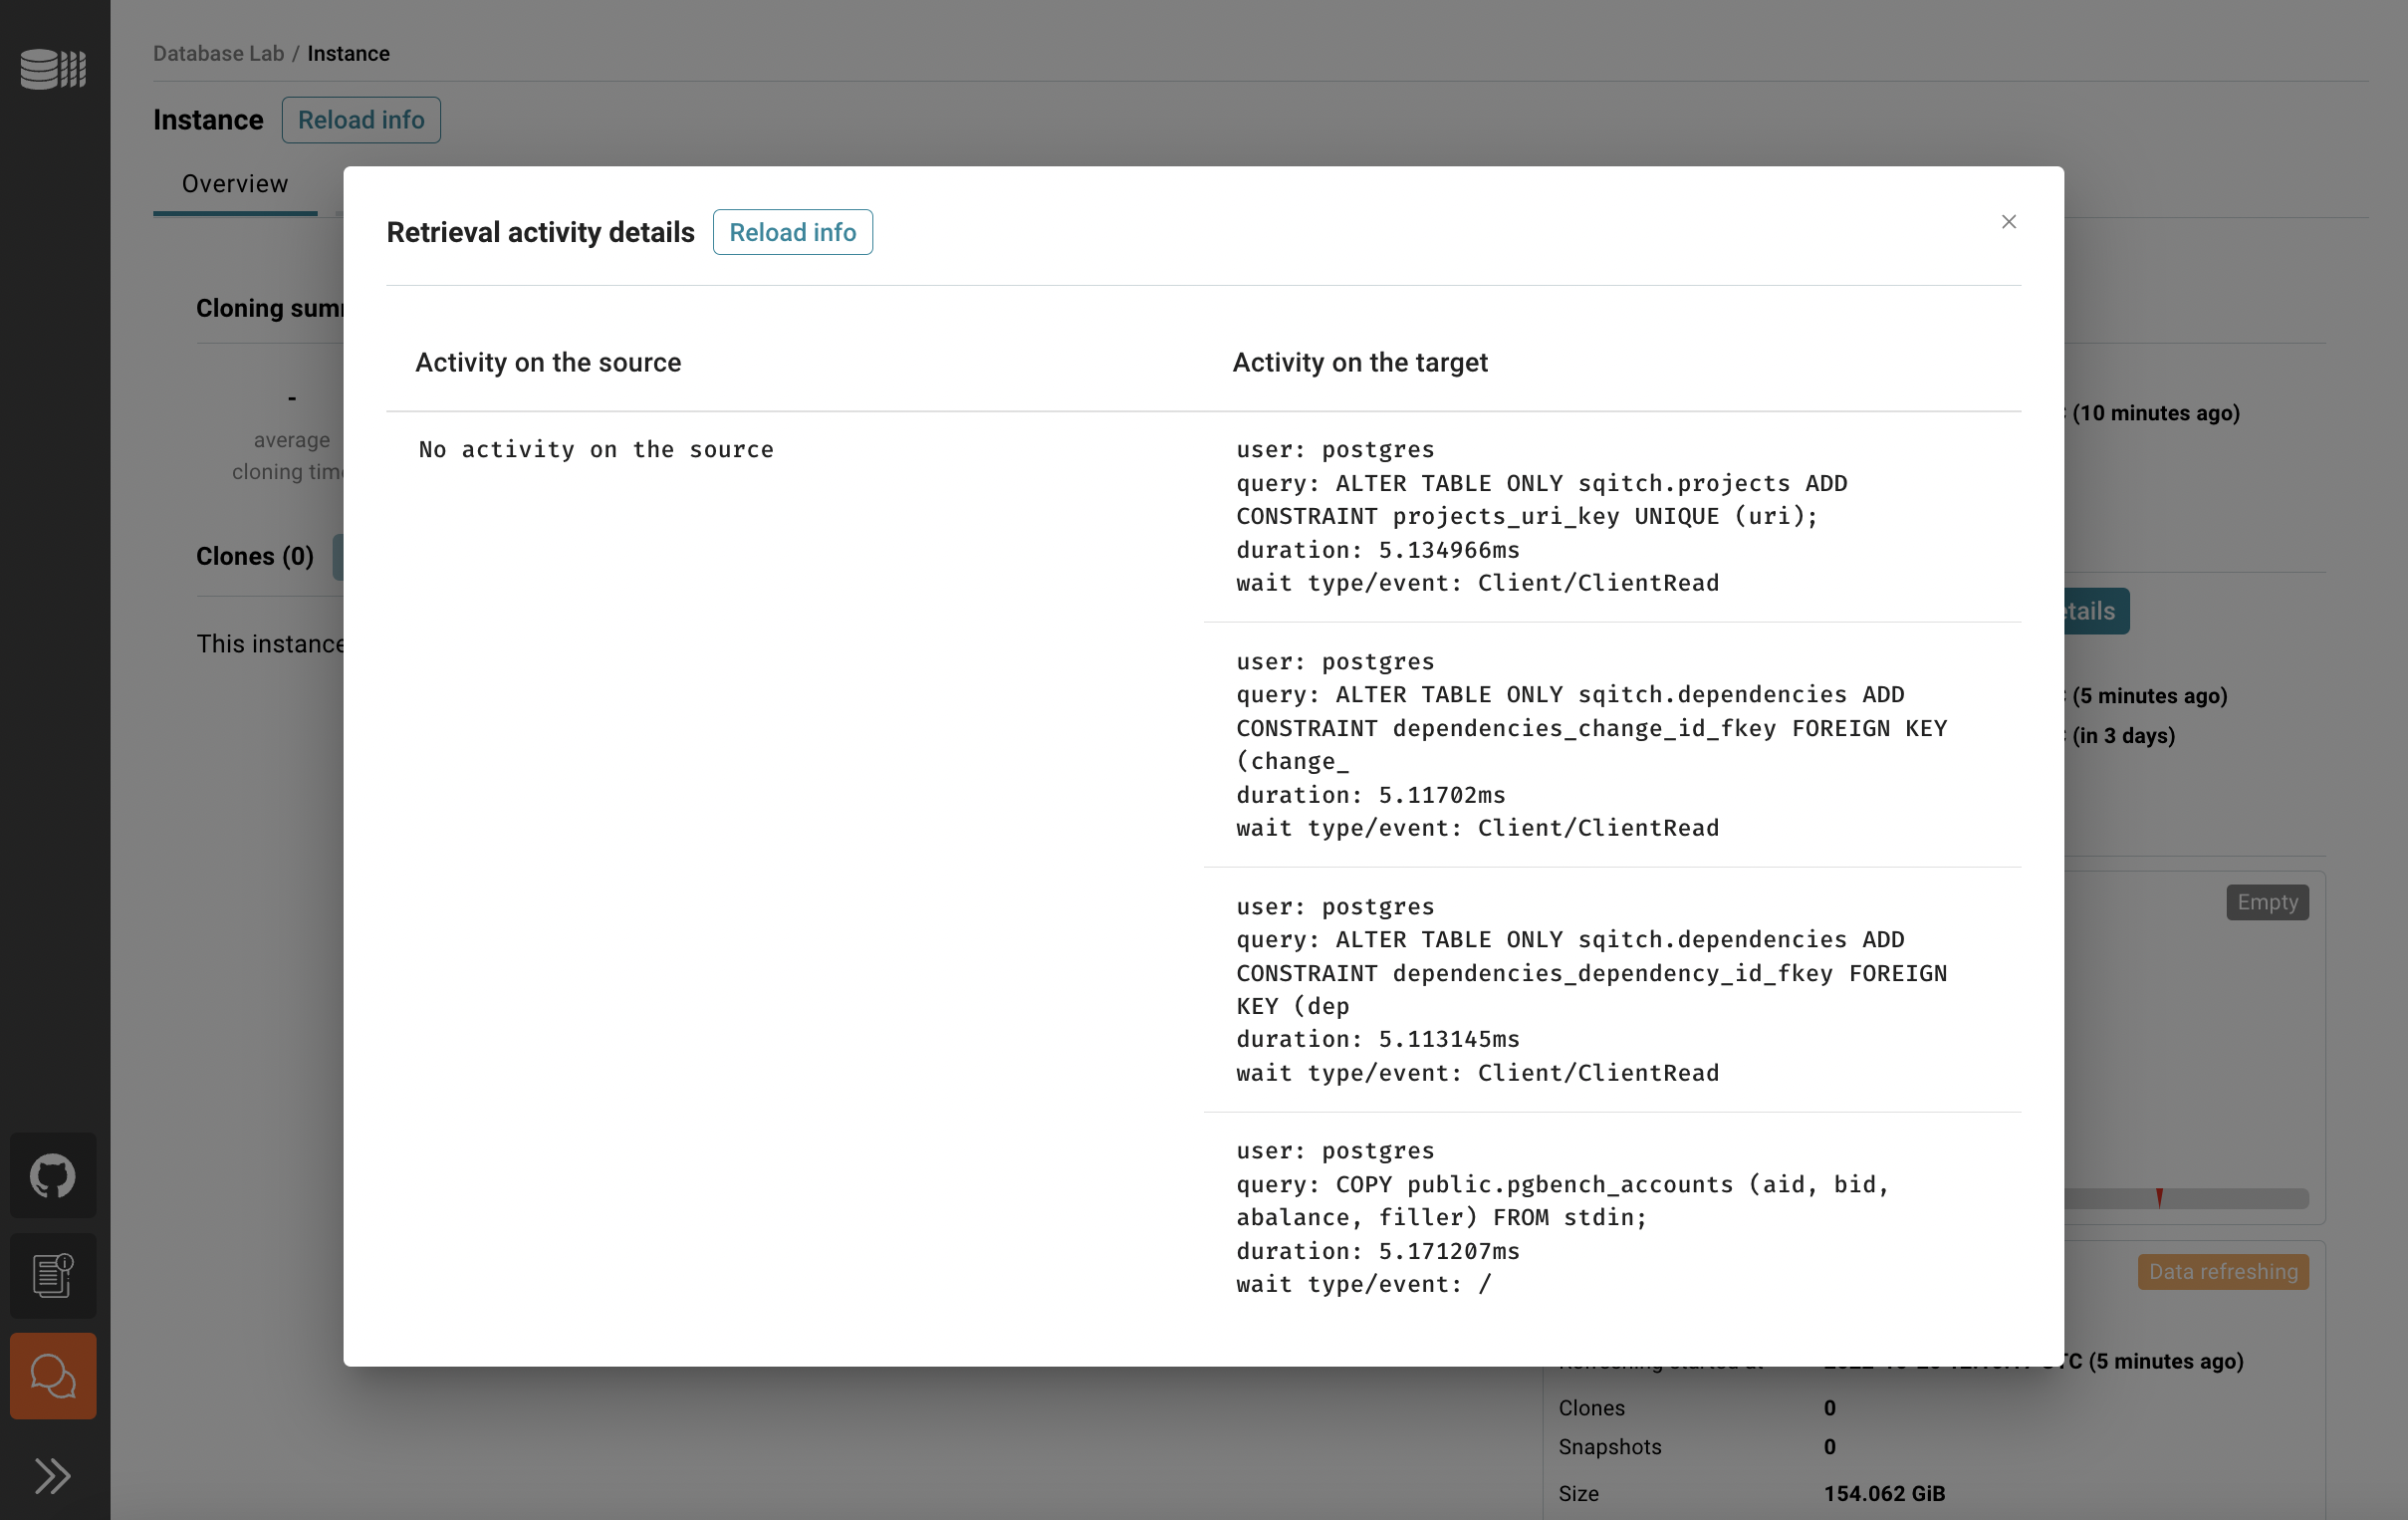
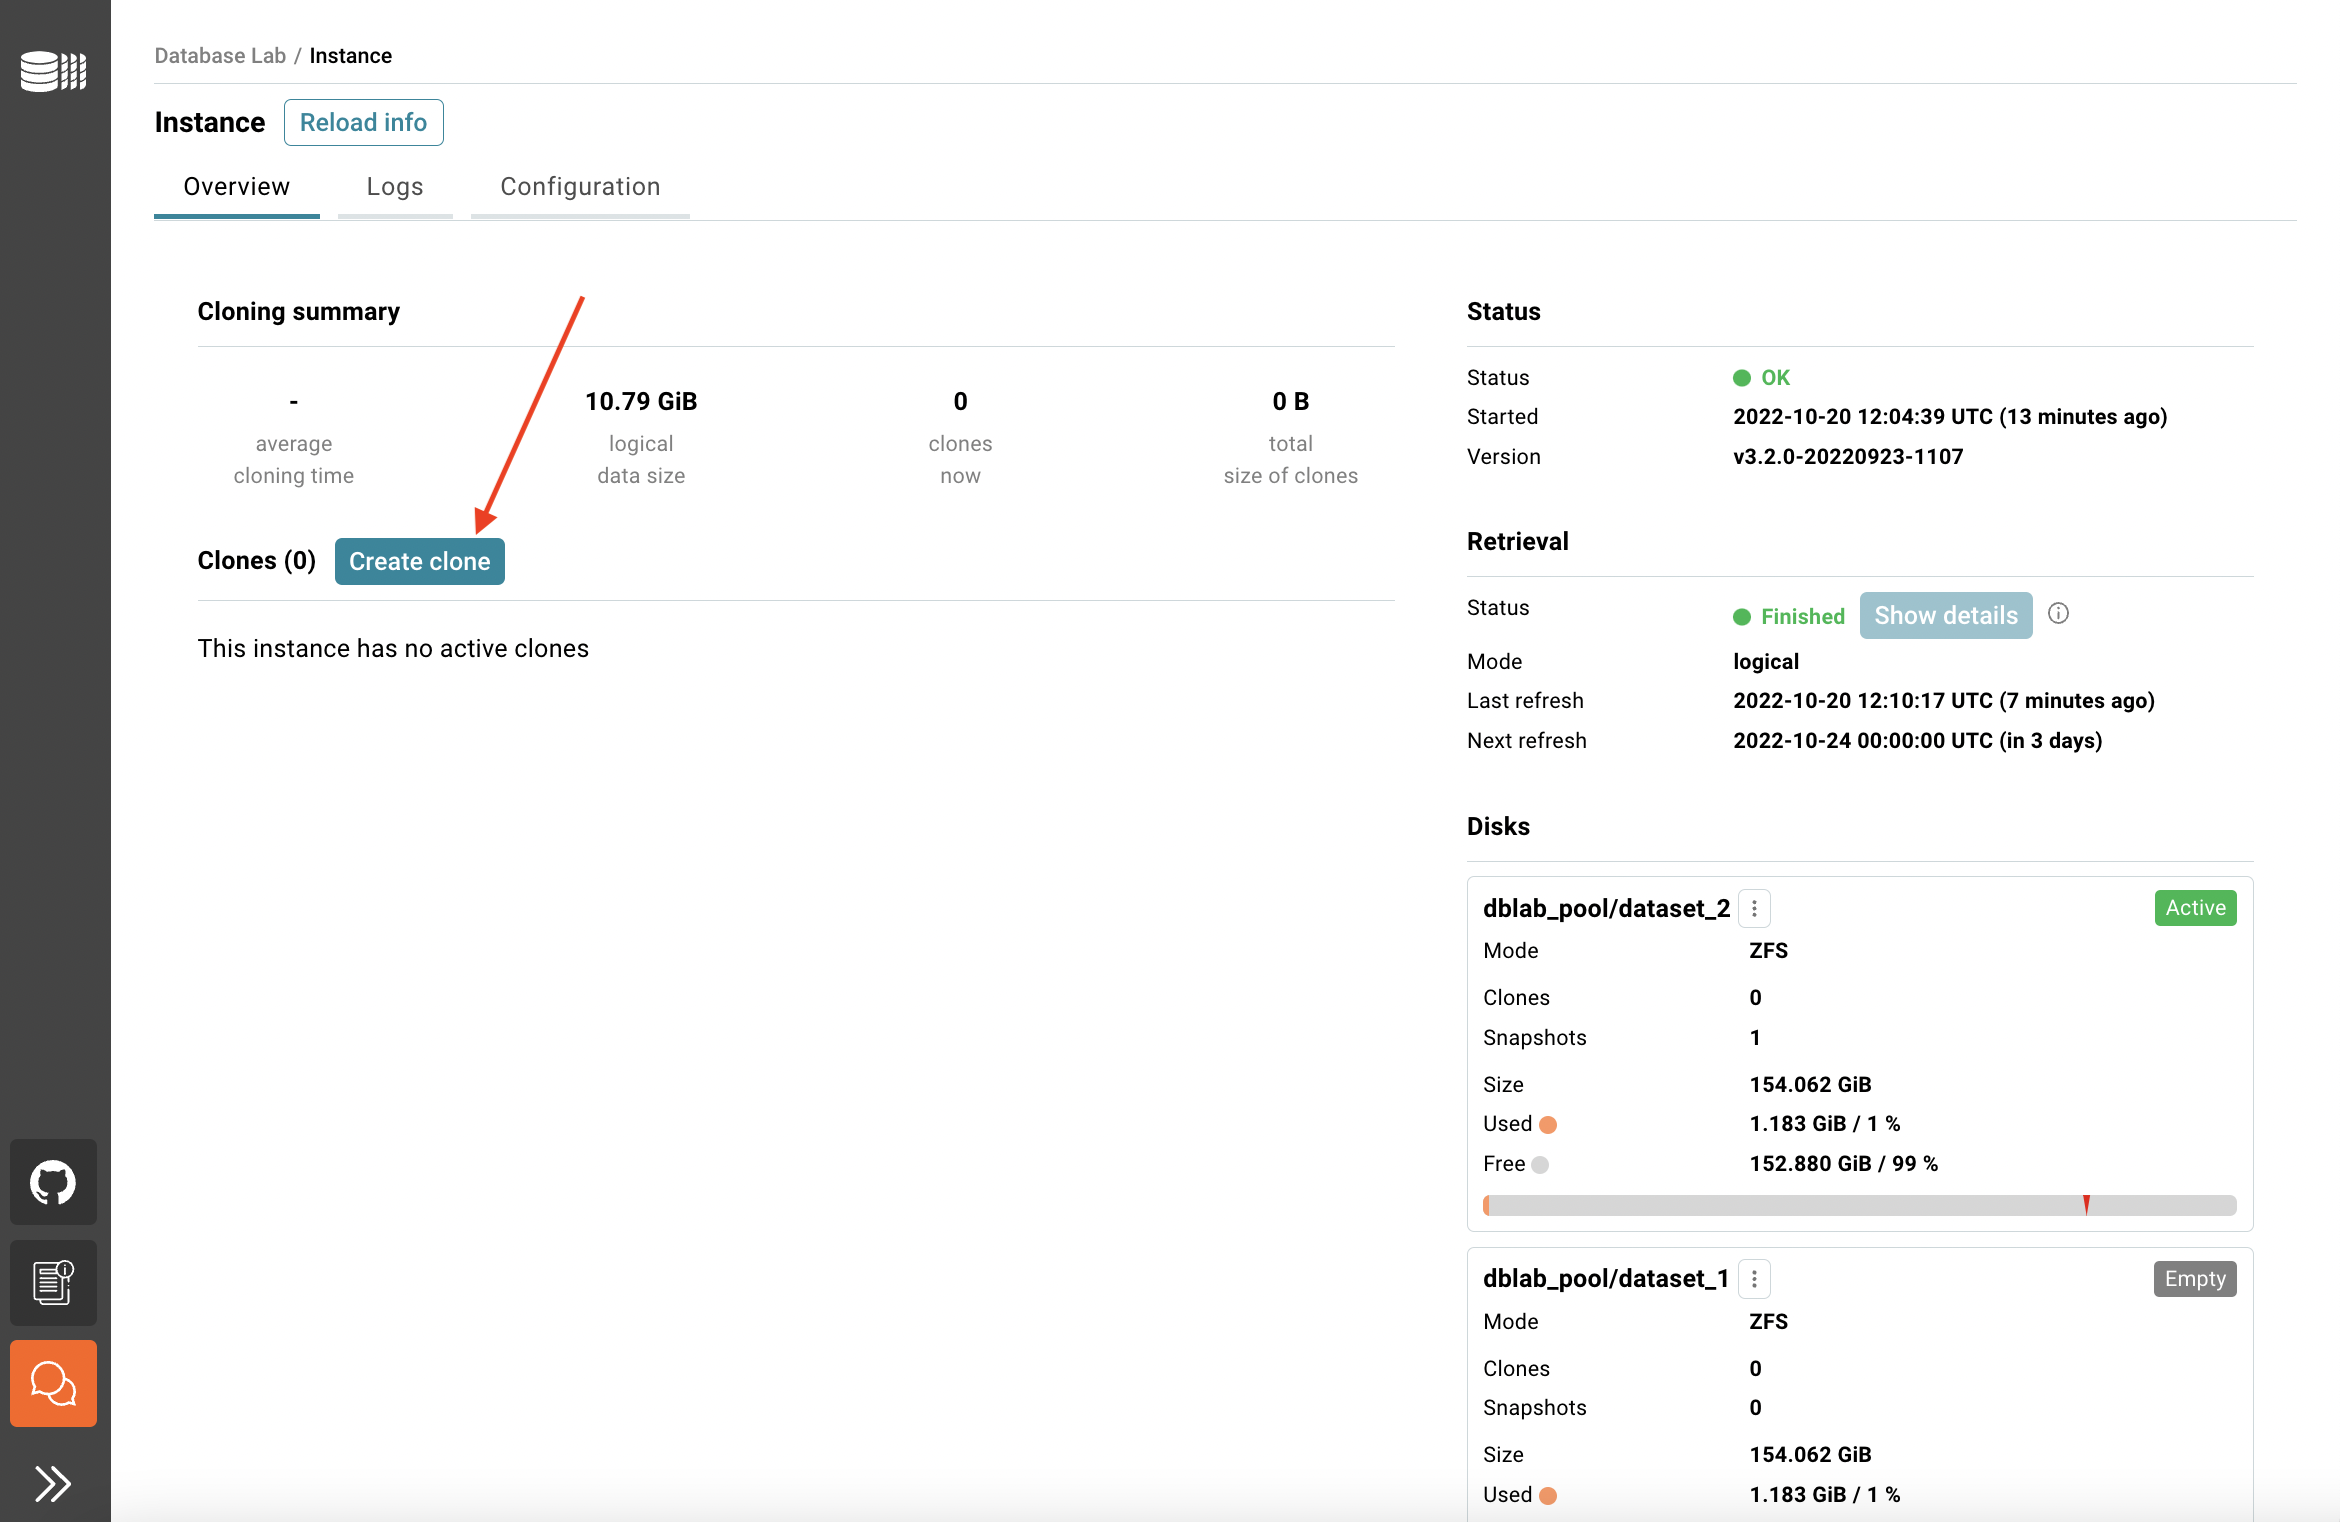
In the Overview tab, you can see the status of the data retrieval. Note that the initial data retrieval takes some time – it depends on the source database size. However, DLE API, CLI, and UI are already available for use. To observe the current activity on both source and target sides use "Show details".
Once the retrieval is done, you can create your first clone. Happy cloning!
Video demonstration of steps 1 and 2
Need to start over? Here is how
If data provisioning fails, you can always:
- check out the "Logs" tab to see what's wrong,
- adjust the configuration in the "Configuration" tab, and
- perform a new attempt to initialize DLE.
If something went south in general and you need a fresh start, go back to AWS CloudFormation and delete your stack; then start from the very beginning of this tutorial
Getting support
With DLE installed from AWS Marketplace, the guaranteed vendor support is included – please use one of the available ways to contact.
Troubleshooting
To troubleshoot:
- Use SSH to connect to the EC2 instance
- Check the containers that are running:
sudo docker ps(to see all containers including the stopped ones:sudo docker ps -a) - See and observe the DLE logs:
sudo docker logs -f dblab_server(the same logs you can observe in UI – the "Logs" tab) - If needed, check Postgres logs for the main branch. They are located in
/var/lib/dblab/dblab_pool/dataset_1/data/logfor the first snapshot of the database, in/var/lib/dblab/dblab_pool/dataset_2/data/logfor the second one (if it's already fetched); if you have configured DLE to have more than 2 snapshots, check out the other directories too (/var/lib/dblab/dblab_pool/dataset_$N/data/log, where$Nis the snapshot number, starting with1)
Step 3. Start experimenting!
With DBLab, you can create safe, instant copies of your database: perfect for testing, experimenting, or trying out new ideas. In this step, you'll learn how to:
- Make a clone (your own private copy)
- Save a snapshot (bookmark your progress)
- Branch off to experiment without risk
Cloning
UI
Create a clone
- Click the Create clone button.
- Fill the ID field with a meaningful name.
- (optional) By default, the latest data snapshot (closest to production state) will be used to provision a clone. You can choose another snapshot if any.
- Fill database credentials. Remember the password (it will not be available later, DBLab Platform does not store it!) – you will need to use it to connect to the clone.
- Click the Create clone button and wait for a clone to be provisioned. The process should take only a few seconds.
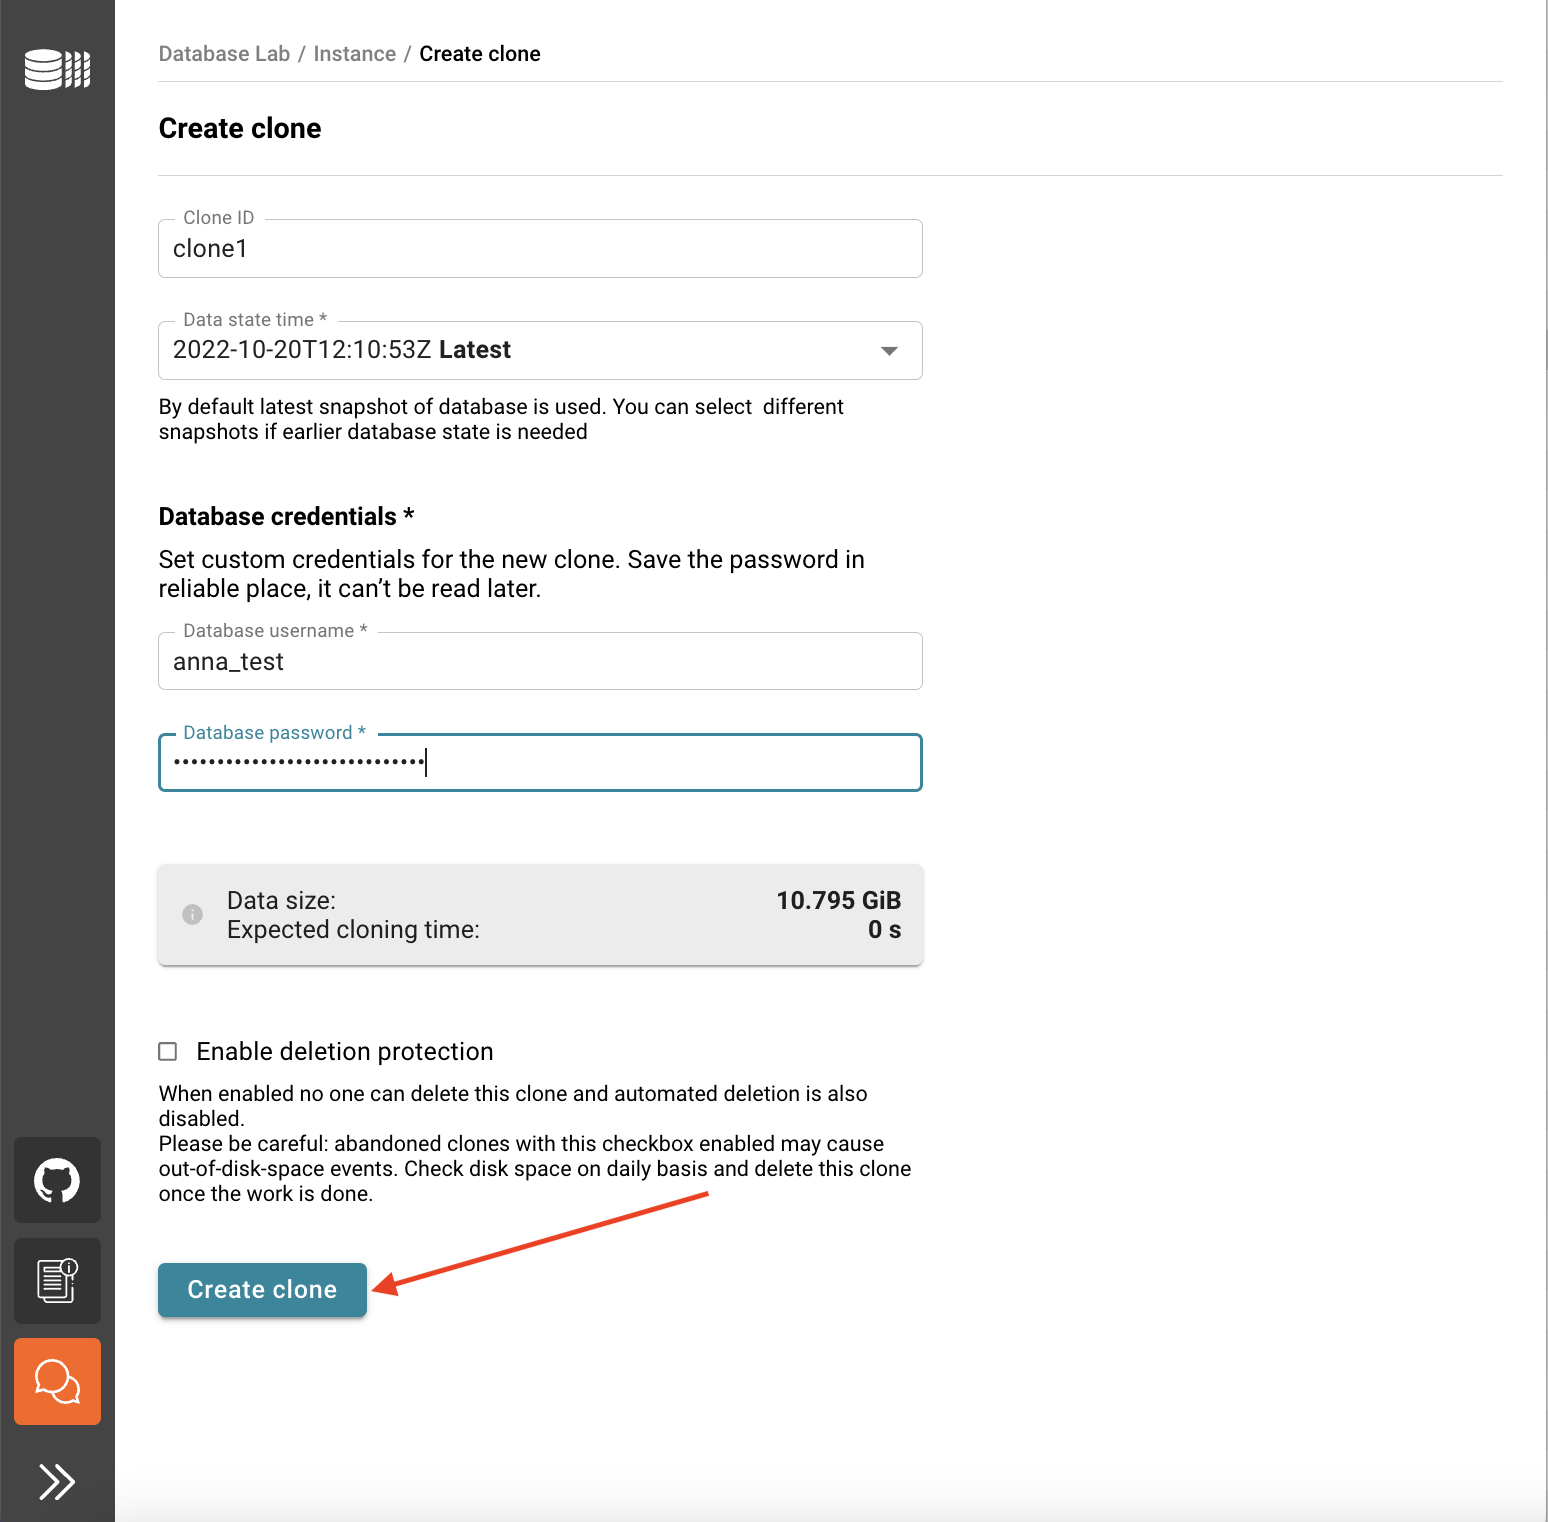
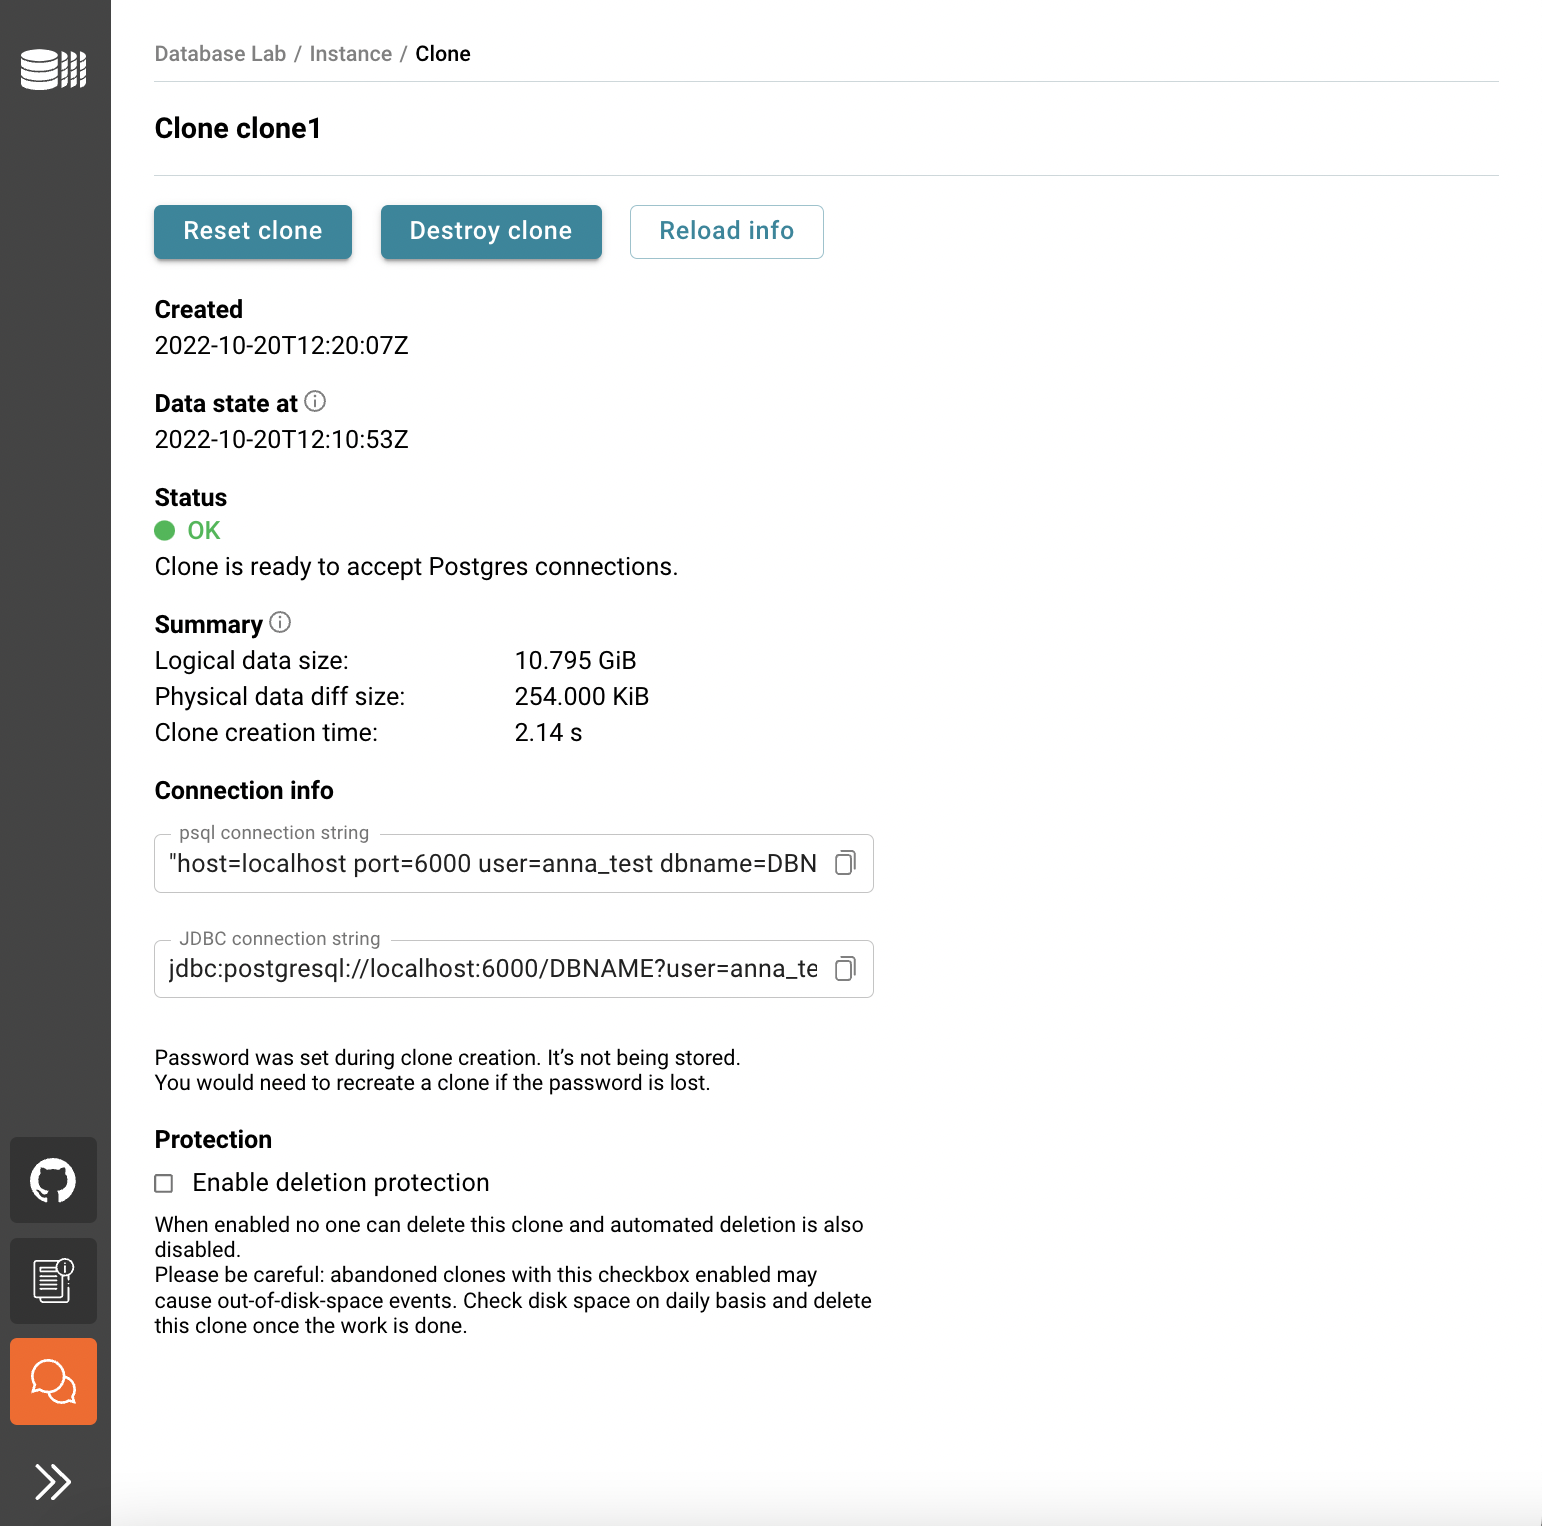
- You will be redirected to the Database Lab clone page.
Connect to a clone
- From the Database Lab clone page under section Connection info, copy the psql connection string field contents by clicking the Copy button.
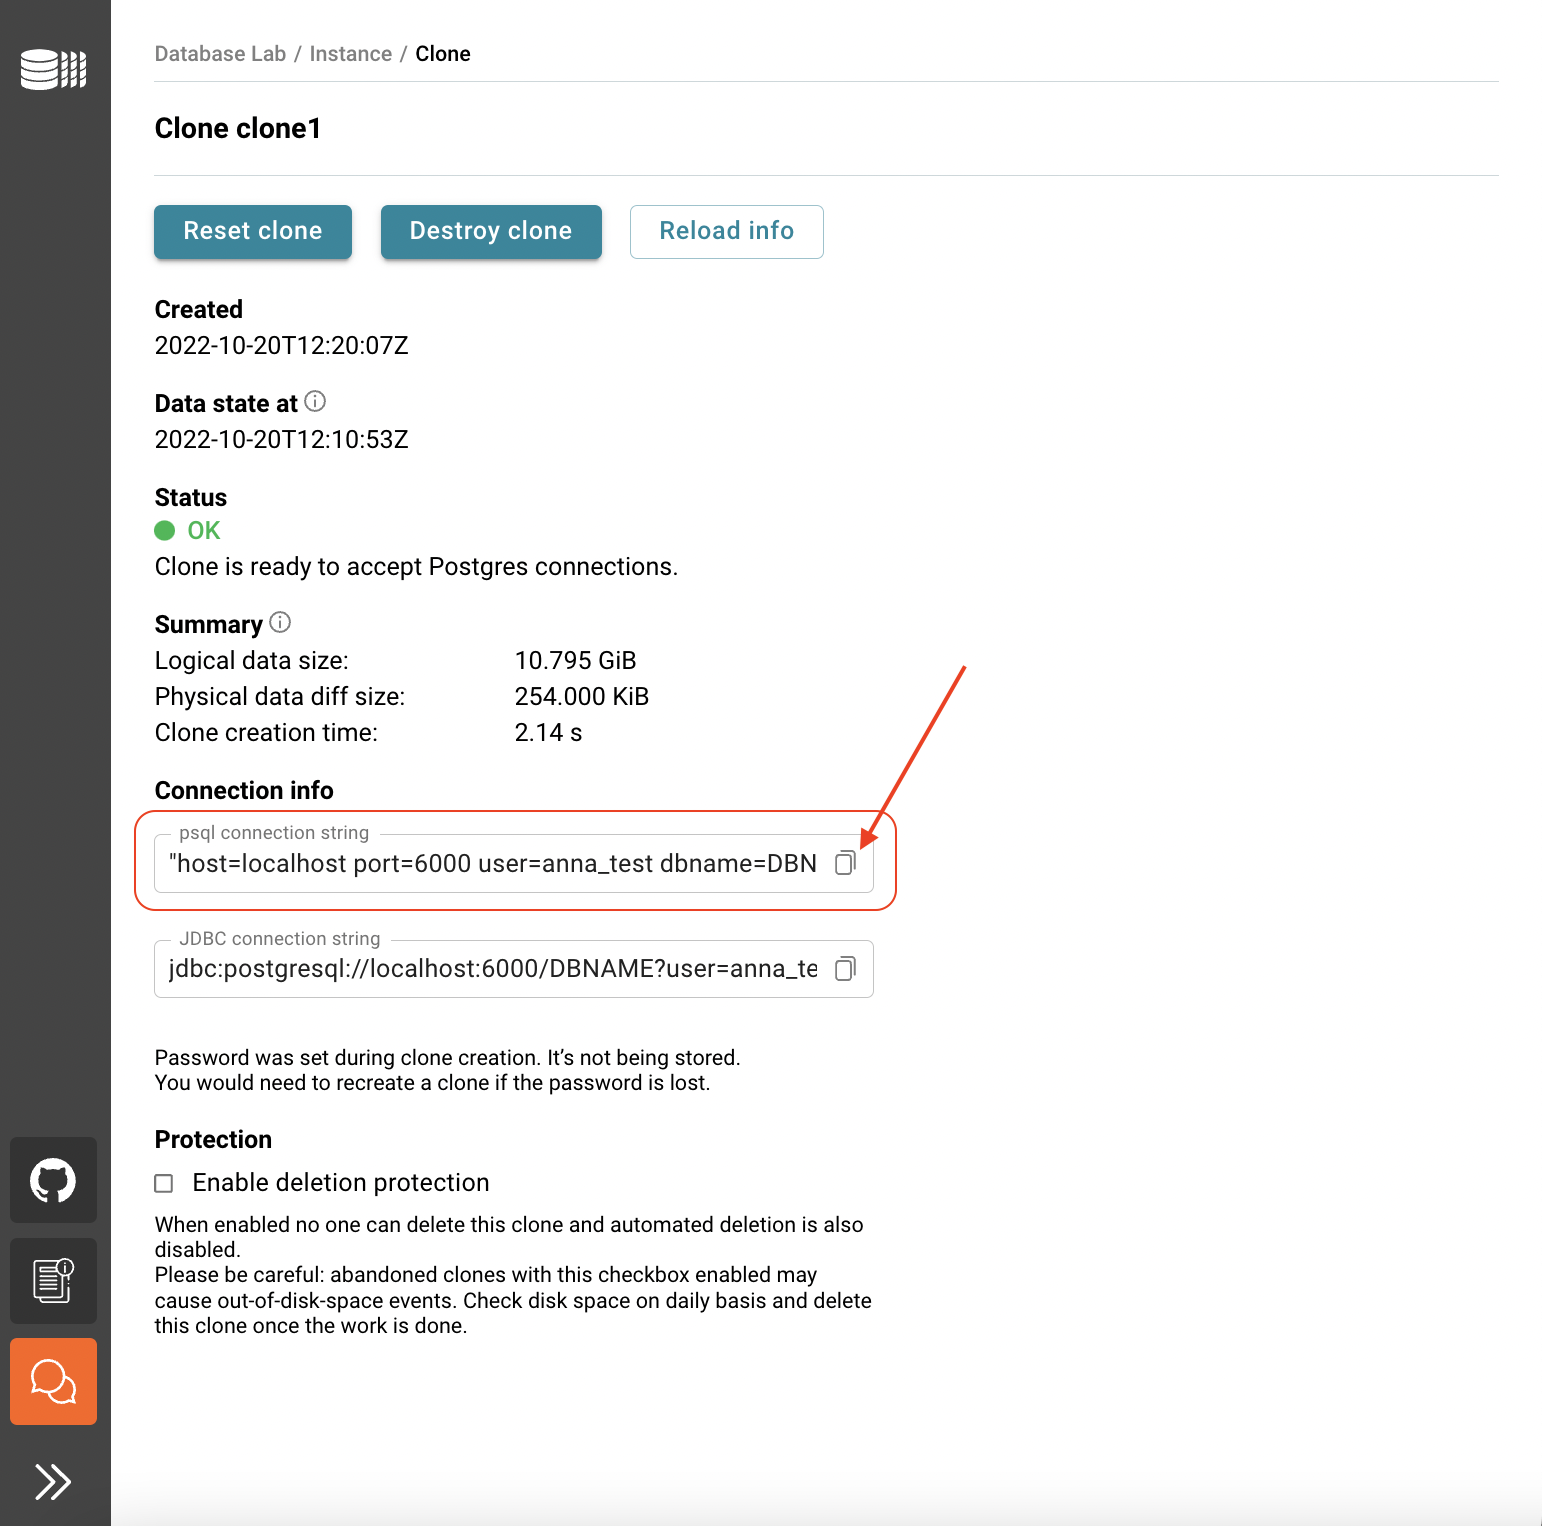
- Here we assume that you have
psqlinstalled on your working machine. In the terminal, typepsqland paste the psql connection string field contents. Change the database nameDBNAMEparameter, you can always usepostgresfor the initial connection. - Run the command and type the password you've set during the clone creation.
- Test established connection by listing tables in the database using
\d.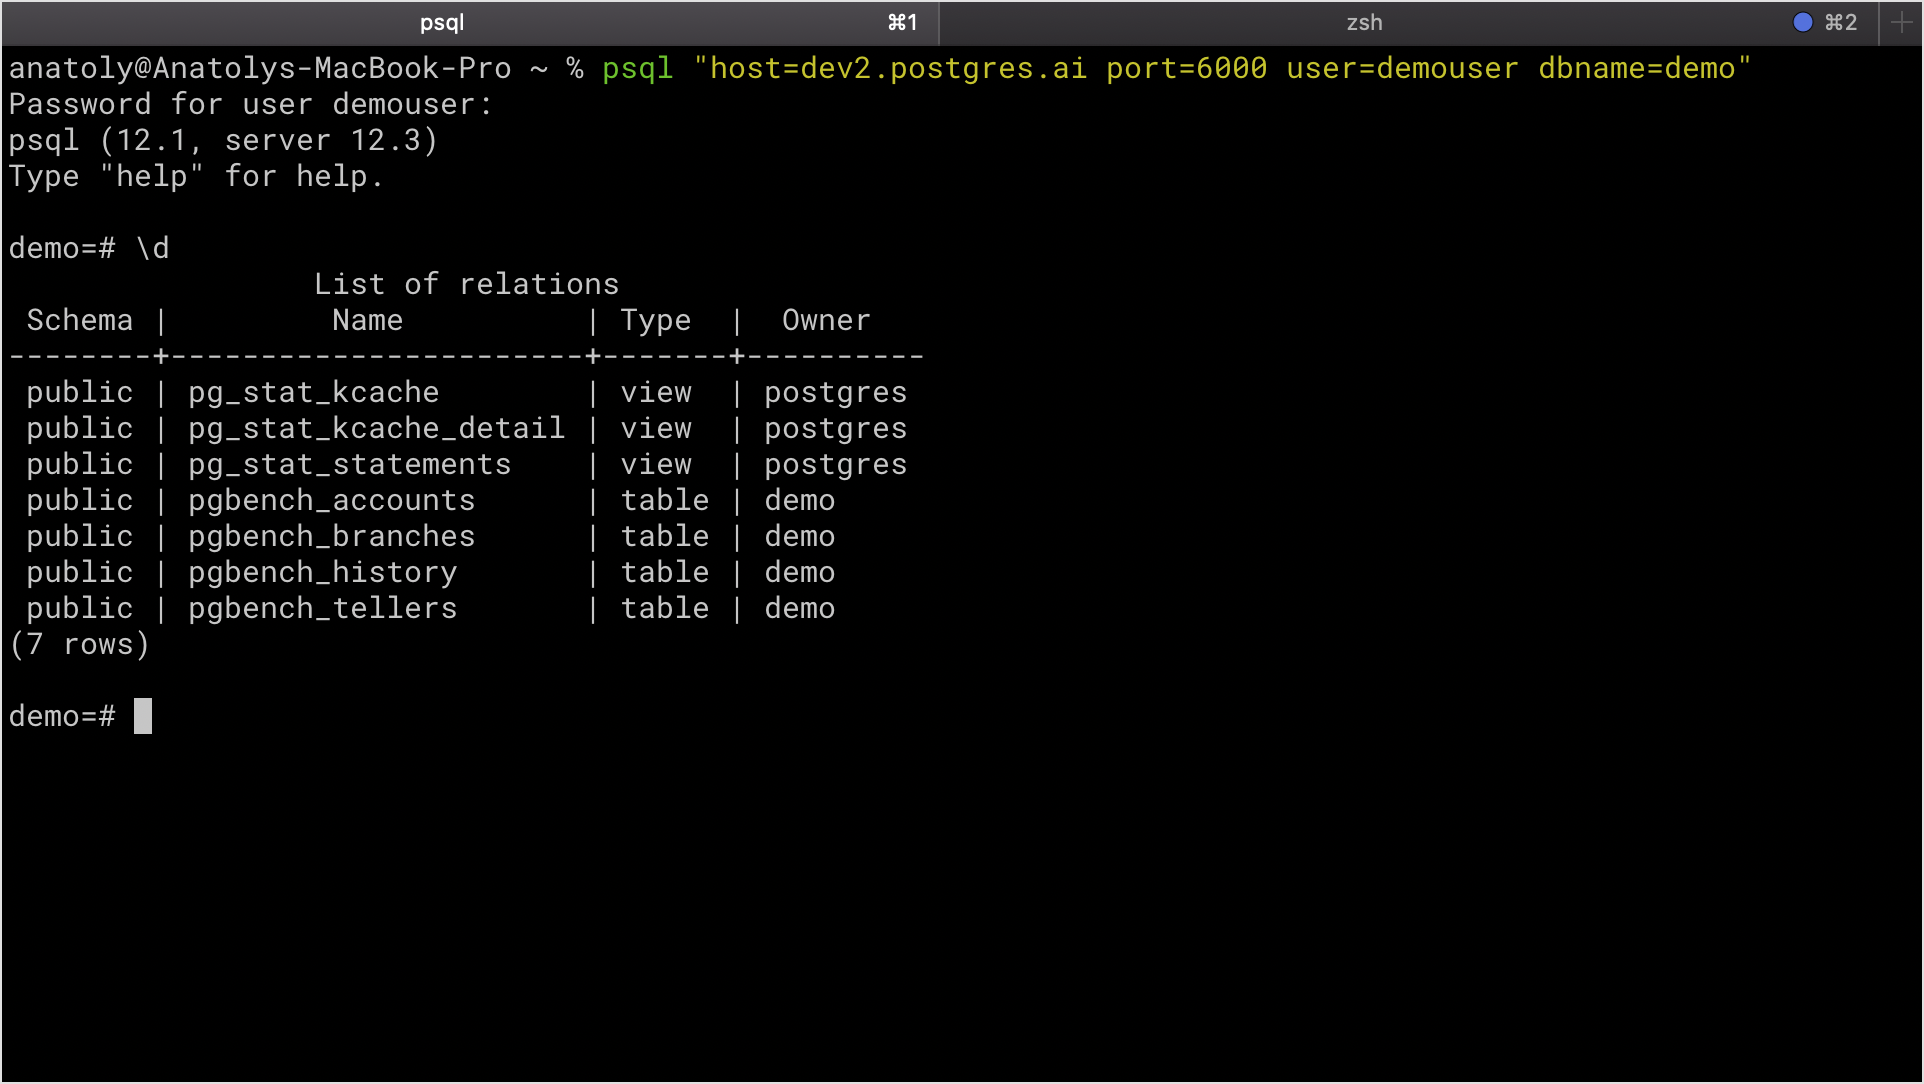
CLI
Install DLE client CLI (dblab)
CLI can be used on any machine, you just need to be able to reach the DLE API (port 2345 by default). In this tutorial, we will install and use CLI locally on the EC2 instance.
curl -fsSL https://gitlab.com/postgres-ai/database-lab/-/raw/master/engine/scripts/cli_install.sh | bash
sudo mv ~/.dblab/dblab /usr/local/bin/dblab
Initialize CLI configuration (assuming that localhost:2345 forwards to DLE machine's port 2345):
dblab init \
  --environment-id=tutorial \
  --url=http://localhost:2345 \
  --token=secret_token \
  --insecure
Check the configuration by fetching the status of the instance:
dblab instance status
Create a clone
dblab clone create \
  --username dblab_user_1 \
  --password secret_password \
  --id my_first_clone
After a second or two, if everything is configured correctly, you will see that the clone is ready to be used. It should look like this:
{
    "id": "botcmi54uvgmo17htcl0",
    "snapshot": {
        "id": "dblab_pool@initdb",
        "createdAt": "2020-02-04T23:20:04Z",
        "dataStateAt": "2020-02-04T23:20:04Z"
    },
    "protected": false,
    "deleteAt": "",
    "createdAt": "2020-02-05T14:03:52Z",
    "status": {
        "code": "OK",
        "message": "Clone is ready to accept Postgres connections."
    },
    "db": {
        "connStr": "host=111.222.000.123 port=6000 user=dblab_user_1",
        "host": "111.222.000.123",
        "port": "6000",
        "username": "dblab_user_1",
        "password": ""
    },
    "metadata": {
        "cloneDiffSize": 479232,
        "cloningTime": 2.892935211,
        "maxIdleMinutes": 0
    },
    "project": ""
}
Connect to a clone
You can work with the clone you created earlier using any PostgreSQL client, for example, psql. To install psql:
- macOS (with Homebrew):
brew install libpq - Ubuntu:
sudo apt-get install postgresql-client
Use connection info (the db section of the response of the dblab clone create command):
PGPASSWORD=secret_password psql \
  "host=localhost port=6000 user=dblab_user_1 dbname=test"
Check the available tables:
\d+
Now let's see how quickly we can reset the state of the clone. Delete some data or drop a table. Do any damage you want! And then use the clone reset command (replace my_first_clone with the ID of your clone if you changed it). You can do it not leaving psql – for that, use the \! command:
\! dblab clone reset my_first_clone
Check the status of the clone:
\! dblab clone status my_first_clone
Notice how fast the resetting was, just a few seconds! 💥
Reconnect to the clone:
\c
Now check the database objects you've dropped or partially deleted – the "damage" has gone.
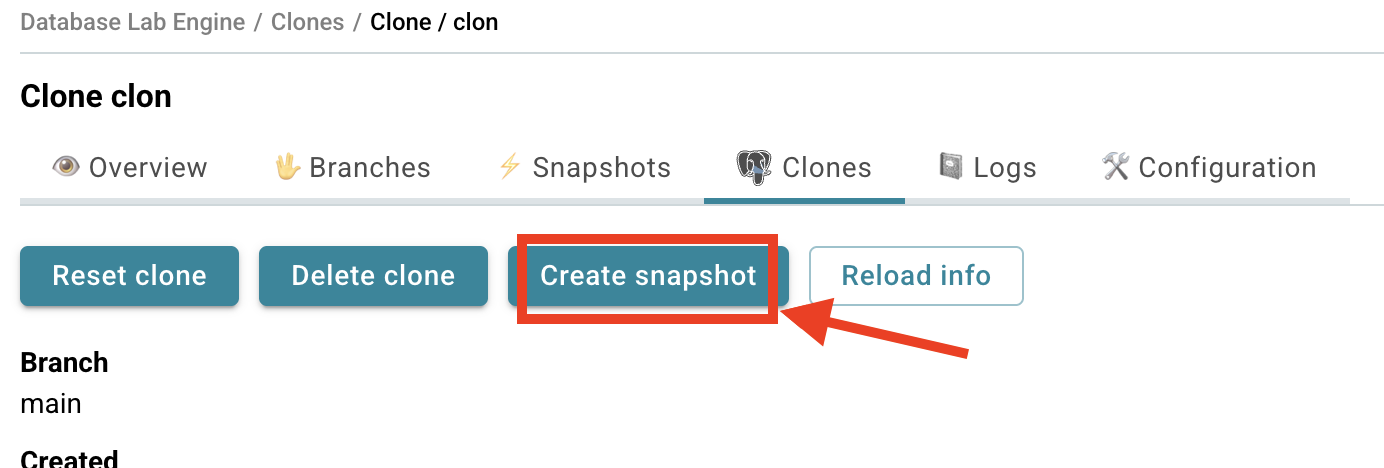
Create a snapshot
UI
Let's capture a snapshot of your database state. Think of it as creating a checkpoint - you can always return to this exact moment later, or use it as a starting point for new experiments.
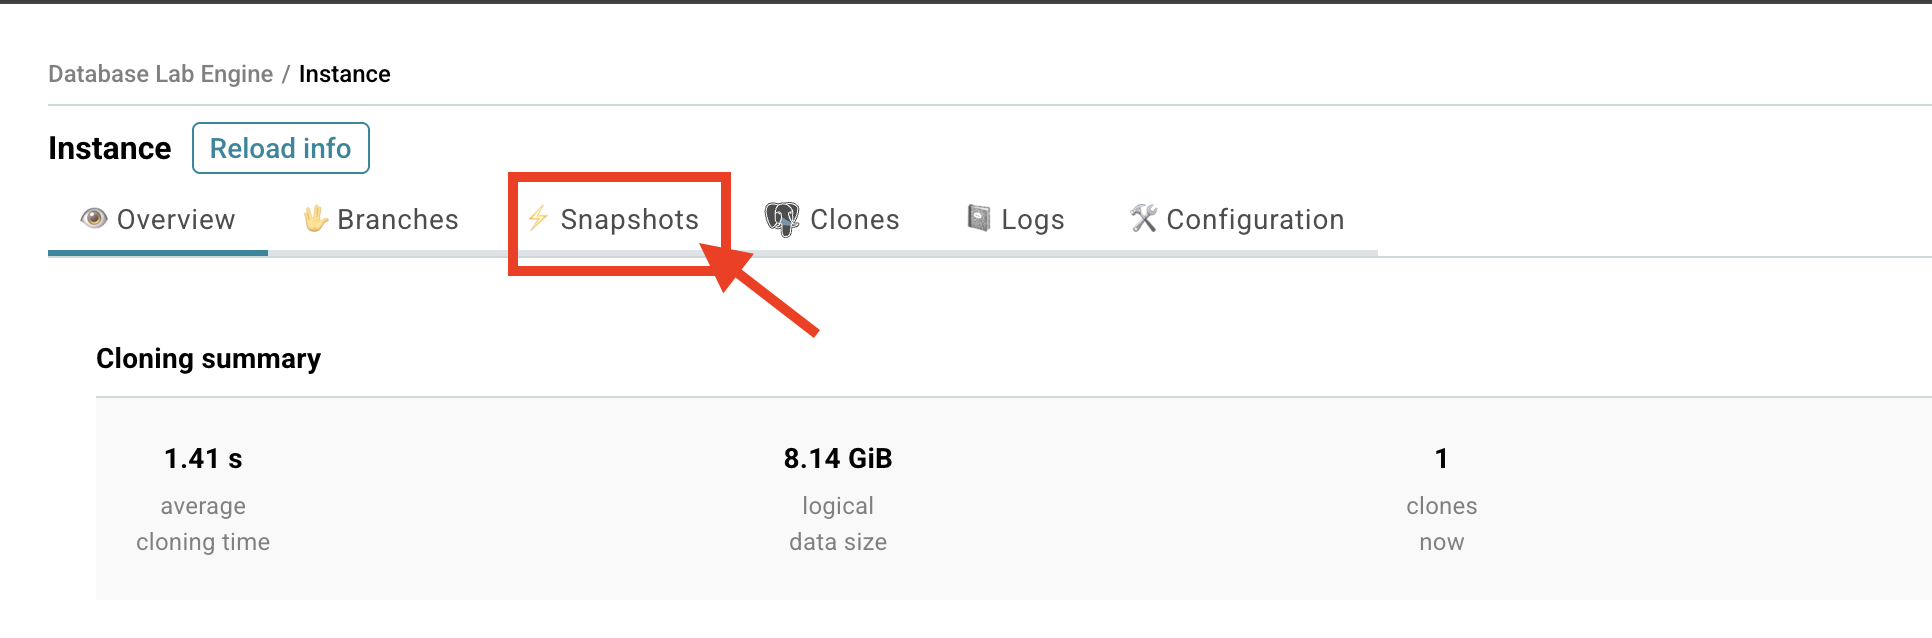
- Find the Snapshots section on your DBLab instance page.
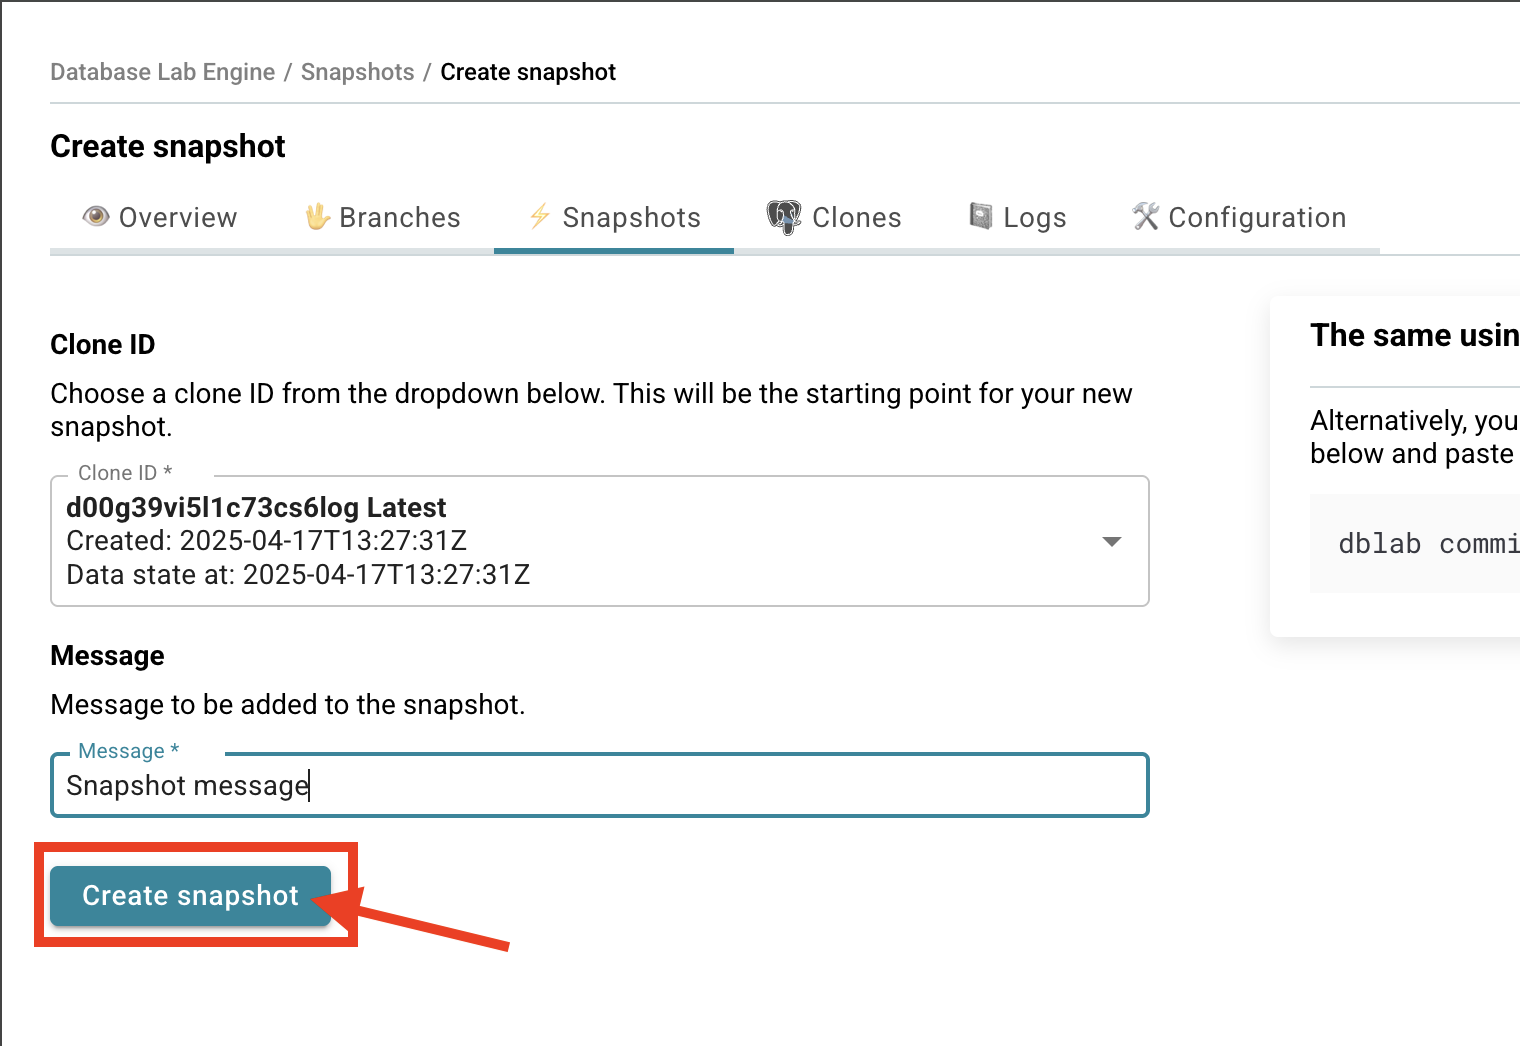
- Click Create snapshot - you'll see a form appear.
- Choose which clone you want to snapshot and give it a meaningful message.
- Click Create.
- You'll be taken to your DBLab Snapshot page - success! 🎉
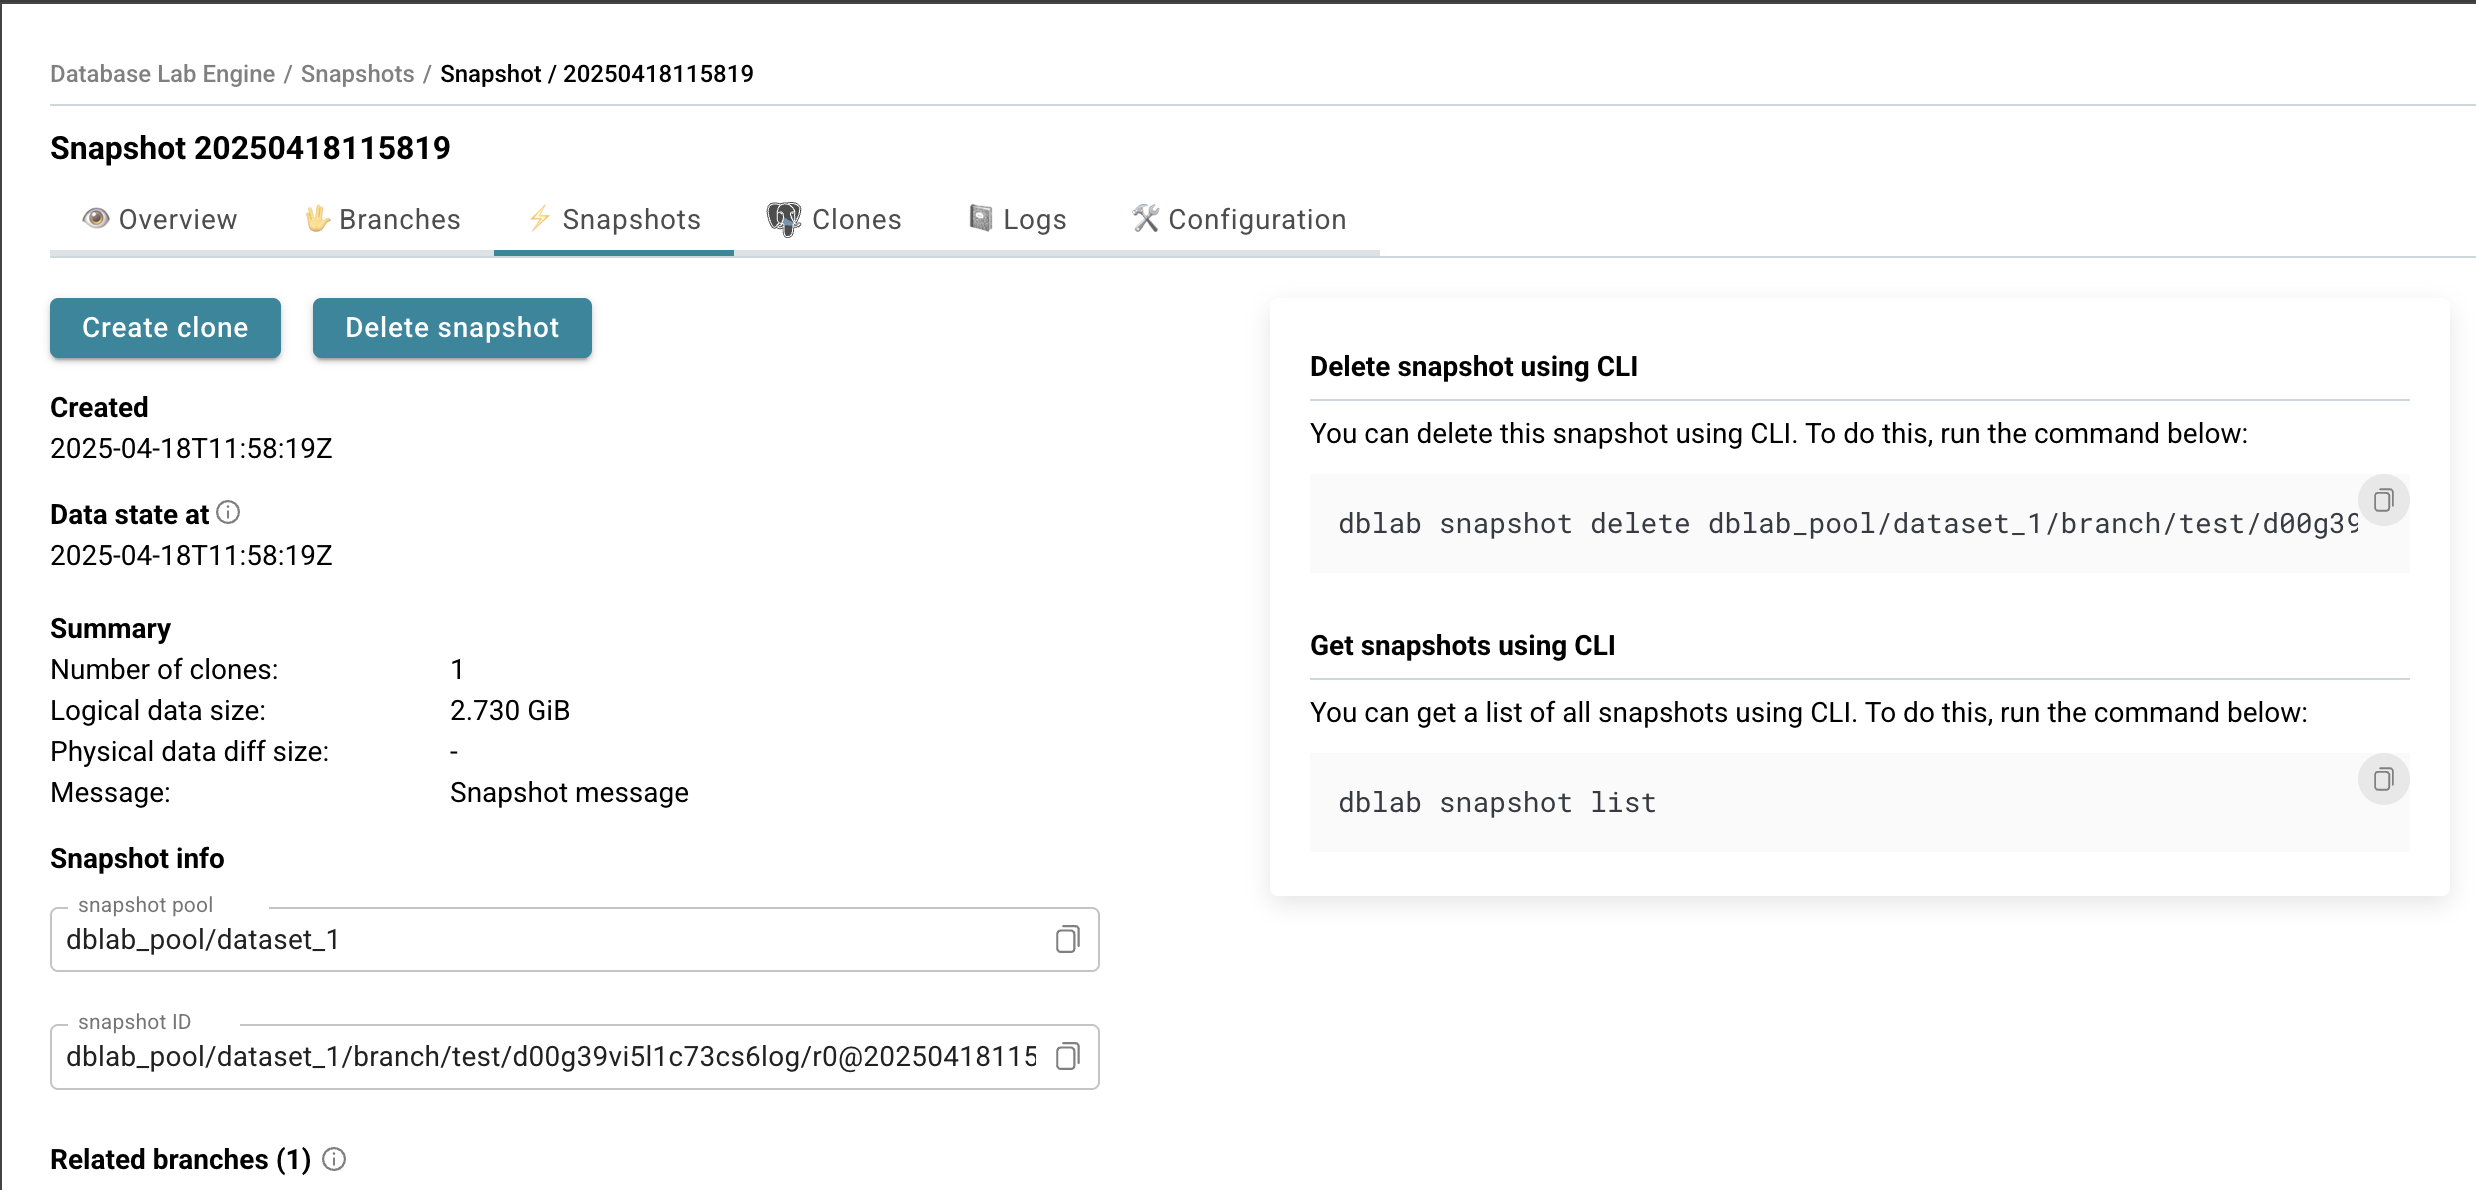
You can now use the snapshot as a base for new clones or branches!
Pro tip: You can also create snapshots directly from any clone page - just look for the "Create snapshot" button there.
CLI
You can also create snapshots from the CLI:
dblab commit --clone-id my_first_clone --message "Snapshot message"
Replace my_first_clone with your actual clone ID (you can see it in the UI or use dblab clone list to list them).
Want to see all your snapshots? Just run:
dblab snapshot list
Instant database branching
UI
Now let's create your first branch! Branches let you experiment safely, try new features, or test fixes in your own isolated environment.
- Find the Branches section on your DBLab instance page.
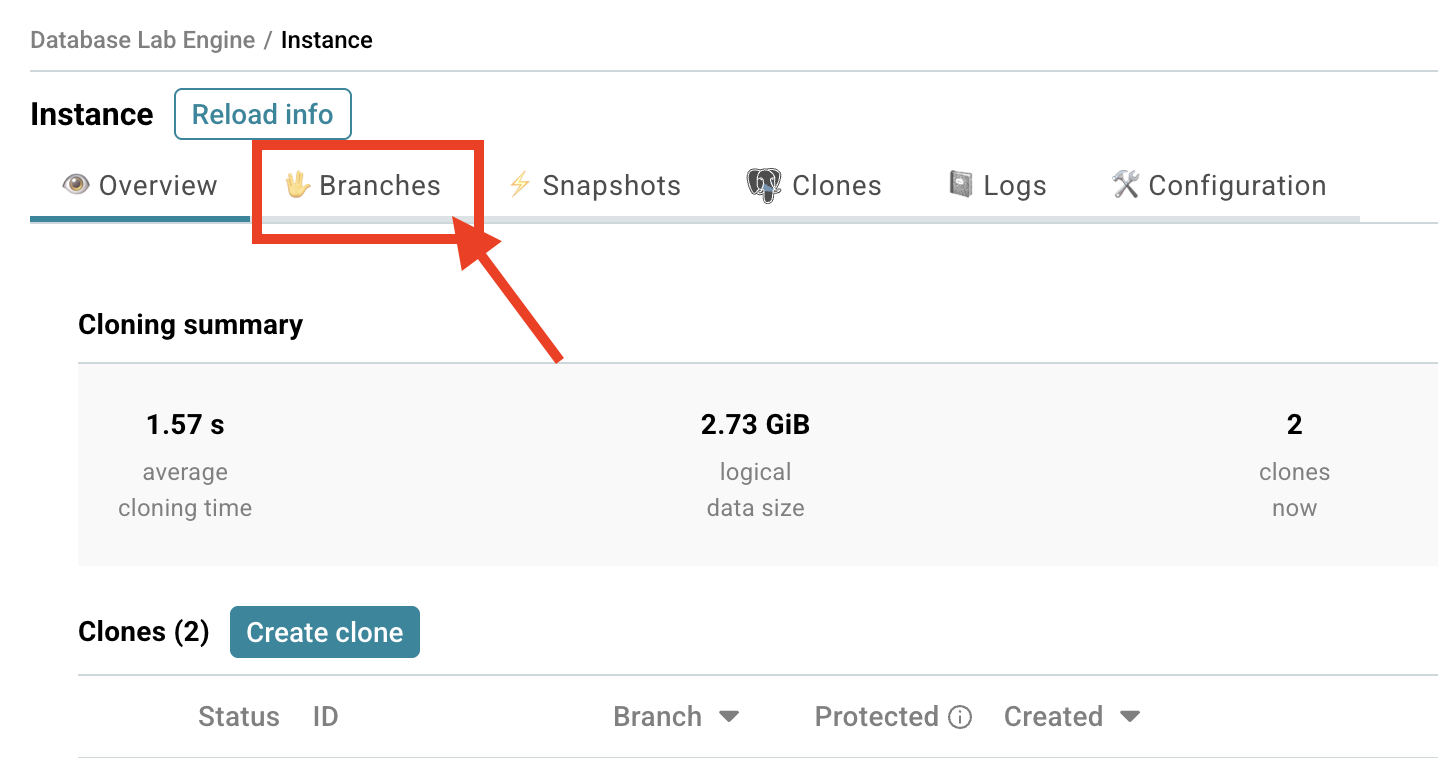
- Click Create branch.
- Give your branch a meaningful name.
- Choose the parent branch (
mainby default) and/or a snapshot that will be memorized as a forking point. - Click Create.
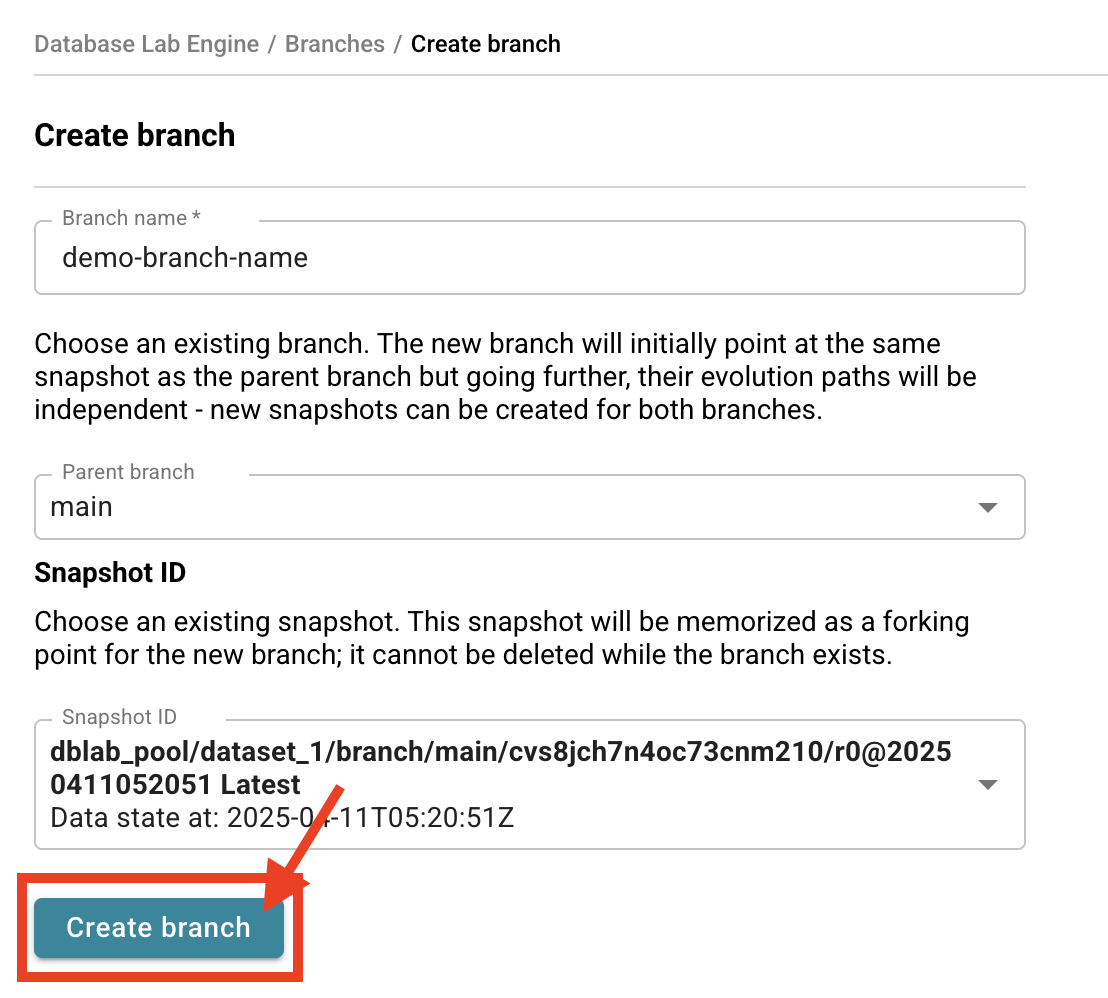
- You'll be taken to your DBLab Branch page - you're all set! 🚀
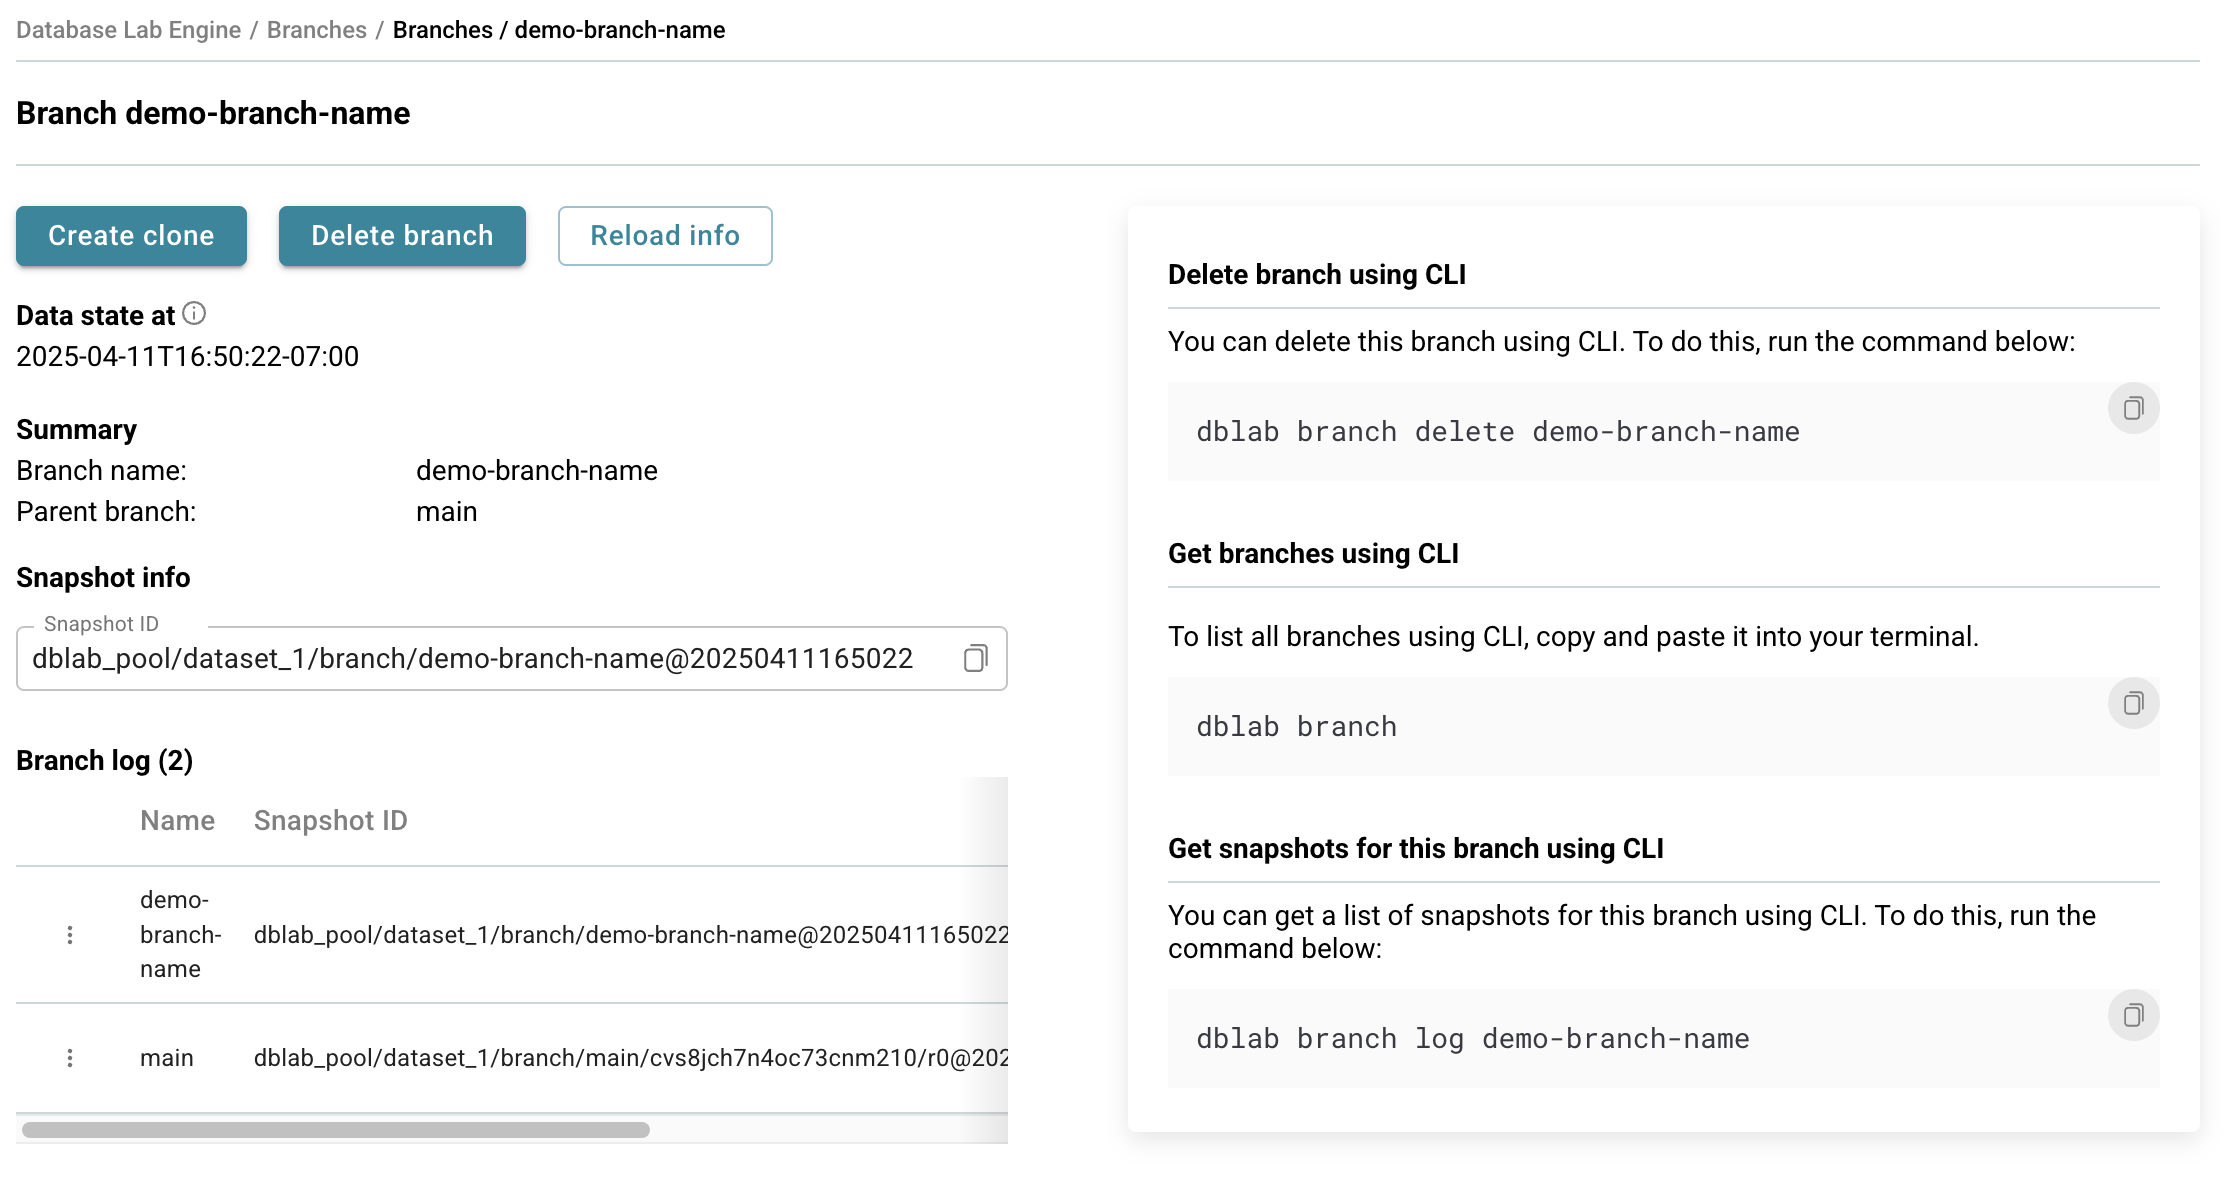
Your new branch is now ready for you to use!
CLI
To create a branch from the command line:
dblab branch my_first_branch
By default, the current branch will be the parent of the new one. You can see your current branch, along with other existing branches, using this command:
dblab branch
Additionally, you can specify the parent branch or the snapshot when creating a branch:
dblab branch --parent-branch my_first_branch my_second_branch

dblab branch --snapshot-id SNAPSHOT_ID my_first_branch
Try it out: Create a branch, make some changes to your data, then create another branch from that point. You're now branching like a pro! 🌿
For more, see the full client CLI reference.
Reach out to the PostgresAI team, we'll be happy to help!